Entity Management
This page describes how to create, edit, delete, and search for entities effectively. This ensures your organizational structure remains accurate and up-to-date.
Creating an Entity
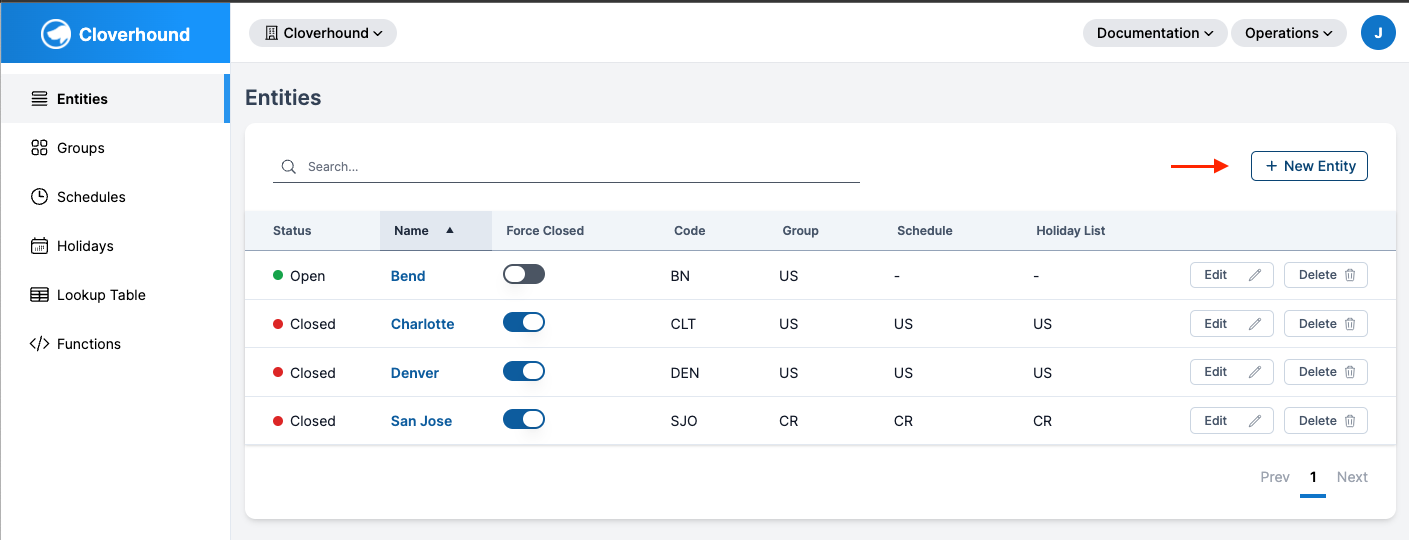
- Navigate to the Entities page: Open the entities section within the Operations module.
- Click on the "New Entity" Button: Initiate the creation process by clicking the button labeled "New Entity."
Required Fields for a New Entity
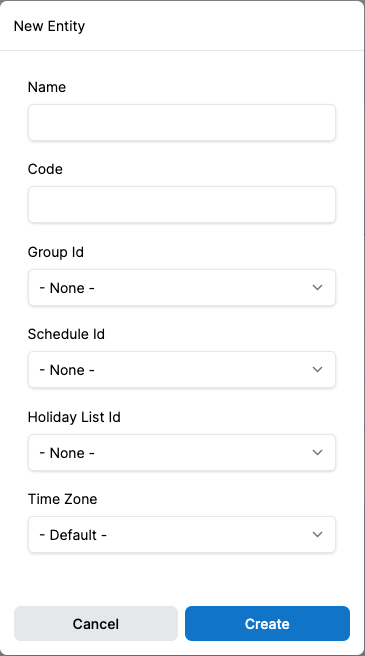
When creating an entity, you’ll need to provide the following details:
- Name: Enter a unique and descriptive name for the entity.
- Code: Assign a code to the entity for easier identification and reference.
Dropdown Options
In addition to the required fields, you can choose from the following dropdown options to associate the entity with specific configurations:
- Group: Select a predefined group to categorize the entity.
- Schedule: Assign a schedule that defines the operating hours of the entity.
- Holiday: Link a holiday calendar to manage exceptions effectively.
- Timezone: Choose the appropriate timezone for the entity.
Save the Entity
Once you’ve entered the details and selected the options, click the Save button to add the new entity to your system. The newly created entity will now be available in your organizational structure and can be managed through the entities page.
Searching for an Entity
- Use the Search Functionality: In the entities page, use the search bar to find an entity by its name. Start typing the entity name to see a list of matching results.
- Filter Results: As you type, the list dynamically updates to show only entities that match your query.
- Select the Desired entity: Click on an entity from the search results to view or manage its details.
The search functionality makes it quick and easy to locate specific entities, especially when managing a large number of entries.
Editing an Entity
- Locate the entity: Use the search functionality in the entities page to find the entity you want to edit.
- Open the entity for Editing: Click on the entity entry to open its details.
- Modify the Information: Update the name, code, or any associated dropdown options like Group, Schedule, Holiday, or Timezone.
- Save Changes: Click the Save button to apply the updates. The changes will reflect immediately in your organizational structure.
Deleting an Entity
- Locate the entity: Use the search functionality in the entities page to find the entity you want to delete.
- Select the Delete Option: Click the delete icon or button associated with the entity entry.
- Confirm Deletion: Confirm the deletion in the prompt to remove the entity permanently from your system.
Deleting an entity is irreversible. Ensure the entity is no longer needed before proceeding with this action.
The entity page ensures that your contact center operations remain well-structured and adaptive to organizational changes. Whether creating new entities, searching for specific entries, updating existing ones, or removing obsolete entries, the entities feature provides the flexibility you need.