Cloverhound Cloud Widget Integration
Introduction
To ensure widgets function properly with Webex Contact Center, you must configure them in the desktop layout. Webex Contact Center Desktop uses a JSON file for layout configuration.
Prerequisites
Before setting up the widget, ensure you have:
- A configured Webex Contact Center (WxCC) instance
In the Cloverhound Cloud Admin module, you'll need to:
-
Configure your WxCC OAuth token (found under 'Settings' > 'Webex' tab)
-
Generate an API Key for widget authentication
Learn how to create API Keys here
- Create at least one preview campaign
Learn how to create a preview campaign here
Widget Configuration Steps
Follow these steps to integrate the Cloverhound Cloud widget with Webex Contact Center Desktop:
-
Sign in to Webex Control Hub
-
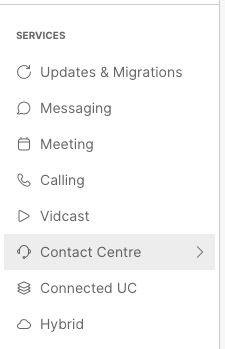
Navigate to Contact Center:
- Find the Services section in the left sidebar
- Select "Contact Center" or "Contact Centre"
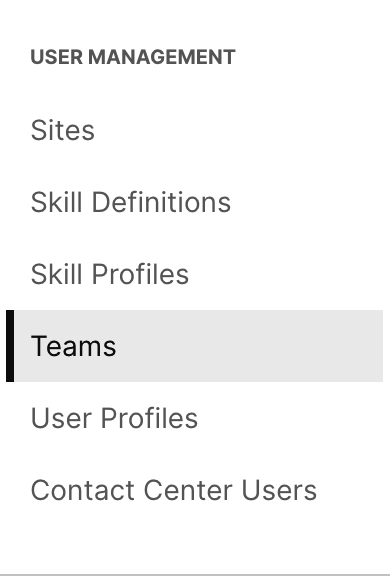
- Access Teams:
- Look for User Management in the left sidebar
- Select "Teams"
-
Check your team's Desktop Layout setting:
- Open the team settings
- Note the current Desktop Layout value
-
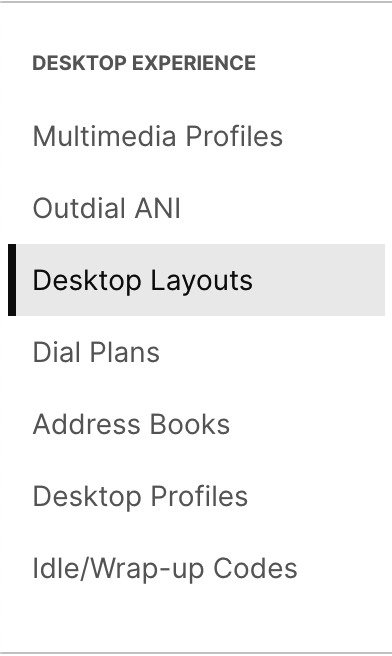
Configure Desktop Layout:
- Find Desktop Experience in the left sidebar
- Select "Desktop Layouts"
-
Open your team's Desktop Layout:
- Note which other teams share this layout
-
Download the layout file:
- Either use 'Download default desktop layout' or
- Download the current JSON file using the download button
-
Modify the JSON file to include the Cloverhound Cloud widget
See the desktop layout configuration section below
-
Create or update the Desktop Layout in Webex Control Hub with:
- Name (required)
- Description
- Team assignments
- Modified JSON file
-
Upload your modified layout file
-
Save your changes
Edit Desktop Layout File
The header widget can be placed in two locations:
- Left side (next to the logo and title) as a "header" widget
- Right side (next to other header widgets) as an "advancedHeader" widget
For detailed information about the desktop layout JSON format, consult the official Webex documentation.
Cloverhound Cloud Widget Configuration
Add the following JSON to either the advancedHeader or header section under roles:
{
  "comp": "md-tooltip",
  "attributes": {
    "message": "Cloverhound Cloud Widget"
  },
  "children": [
    {
      "script": "https://cloud.cloverhound.com/assets/wxcc_preview_widget.js?noCache=1",
      "comp": "wxcc-cloverhound-widget",
      "properties": {
        "cloudURL": "https://cloud.cloverhound.com",
        "organizationID": "<ORG_ID>",
        "apiKeyID": "<API_Key_ID>",
        "apiKeySecret": "<API_Key_Secret>",
        "previewTimeSeconds": "300",
        "agentName": "$STORE.agent.agentName",
        "isCallInProgress": "$STORE.agentContact.isActiveCall",
        "locationType": "<advancedHeader or header>",
        "darkmode": "$STORE.app.darkMode",
        "accessToken": "$STORE.auth.accessToken",
        "outdialEp": "$STORE.agent.outDialEp",
        "outdialAniList": "$STORE.agent.outdialAniList",
        "teamId": "$STORE.agent.teamId",
        "agentId": "$STORE.agent.agentId",
        "wrapUpData": "$STORE.agent.wrapUpData",
        "allowSkipRecord": "<true or false>",
        "saveCallbacksAsPersonal": "<true or false>",
        "includesUnassignedRecords": "<true or false>",
        "showCustomerData": "<true or false>",
        "autoAnswerReservation": "<true or false>",
        "autoNextRecord": "<true or false>",
        "skipStatus": "<skipped, retry, completed, failed>",
        "saveRecordLocallyEnabled": "<true or false>",
        "synchronizeAfterConnectedEnabled": "<true or false>",
        "fallbackResetTimeoutSeconds": "30"
      }
    }
  ]
}
Replace these values:
<ORG_ID>: Your Cloverhound Cloud organization ID (found in the URL when logged in)<API_Key_ID>: Your API Key ID from Cloverhound Cloud<API_Key_Secret>: Your API Key Secret from Cloverhound Cloud
The widget uses $STORE variables to communicate with Webex Contact Center Desktop.
General key configuration notes:
Team-Configurable Settings
locationType: Its value must correspond to either "header" or "advancedHeader," with the default value being "advancedHeader". It must match the widget's placement ("header" or "advancedHeader").
The following settings are also configurable by team in Cloverhound Cloud, refer to Teams.
The Team Settings take precedence over the Desktop Layout's widget configurations.
- The system first uses the team variable defined in Cloverhound Cloud.
- If the variable is unavailable, it will fall back to the one defined in the layout.
- As a final fallback, it will use the default defined mentioned below.
Key configuration notes for Predictive/Progressive campaigns:
autoAnswerReservation: If enabled, the widget will automatically answer Predictive/Progressive outbound reservation calls. The default value is false.
Key configuration notes for Preview campaigns:
previewTimeSeconds: Time allowed for agents to skip or call a customer record. The default value is 300.allowSkipRecord: If this feature is enabled, the widget permits the agent to skip a record. Otherwise, if this option is not activated, the widget will not provide the ability to skip. The default value is false.includesUnassignedRecords: If this is enabled, the widget retrieves unassigned and personal callback records. If this option is not activated, the widget will display only the personal callback records. The default value is false.saveCallbacksAsPersonal: If this is enabled, the widget will automatically assign the contact callback to the current agent, and the option to save will not be visible to them in the widget. On the other hand, if this feature is disabled, the agent will have the ability to save the callback either as a personal callback or as a general/unassigned callback. The default value is false.showCustomerData: If enabled, the widget will show the customer additional data if present. Otherwise, if disabled, even when the customer data is present, it is hidden. The default value for this configuration is true.autoNextRecord: If disabled, the widget will wait for the agent to click next to show the next customer record. Otherwise, it will display the next record automatically after a record is called. The default value for this configuration is true.skipStatus: This setting can have the following valuesskipped,retry,completed, orfailed. It affects the record that it is skipped by the user or automatically by the widget. The default setting value isskipped. If the setting value isskipped, the record will revert to its original status (pendingorretry). If it is set toretry,completed, orfailed, the skipped record will be set as that value respectively.saveRecordLocallyEnabled: This setting controls whether the record status is stored locally, and later if that local storage item is synced after the Desktop is (re-)connected. The default value for this configuration is true.fallbackResetTimeoutSeconds: Time allowed if the widget gets stuck in a called record, before partially resetting the view for the next record, following the logic of autoNextRecord. The default value is 30 seconds.synchronizeAfterConnectedEnabled: This setting controls whether the local storage item is synced after the Desktop is (re-)connected. The default value for this configuration is true.
Example: Header Placement
    "area": {
      ...
      "header": {
          "id": "dw-header",
          "widgets": {
              "head1": {
                "comp": "md-tooltip",
                "attributes": {
                    "message": "Cloverhound Cloud Widget"
                },
                "children": [
                    {
                        "script": "https://cloud.cloverhound.com/assets/wxcc_preview_widget.js?noCache=1",
                        "comp": "wxcc-cloverhound-widget",
                        "properties": {
                            ...
                            "locationType": "header",
                            ...
                        }
                    }
                ]
            }
          },
          "layout": {
              "areas": [["head1"]],
              "size": {
                "cols": [1],
                "rows": [1]
              }
            }
        }
    }
Example: Advanced Header Placement
  "agent": {
    "area": {
      "advancedHeader": [
        {
          "comp": "md-tooltip",
          "attributes": {
            "message": "Cloverhound Cloud Widget"
          },
          "children": [
            {
                "script": "https://cloud.cloverhound.com/assets/wxcc_preview_widget.js?noCache=1",
                "comp": "wxcc-cloverhound-widget",
                "properties": {
                    ...
                    "locationType": "advancedHeader",
                    ...
                }
            }
          ]
        },
      ],
    }
  }
Example: Navigation Page Placement
To create a custom page accessible from the navigation sidebar, add the widget to the navigation section:
  "agent": {
    "area": {
      "navigation": [
        {
          "nav": {
            "label": "My Callbacks",
            "icon": "calendar-month-bold",
            "iconType": "momentumDesign",
            "navigateTo": "my-callbacks",
            "align": "top"
          },
          "page": {
            "id": "my-callbacks",
            "widgets": {
              "comp1": {
                "comp": "wxcc-callbacks-widget",
                "script": "https://cloud.cloverhound.com/assets/wxcc_callbacks_widget.js?noCache=1",
                "properties": {
                  "cloudURL": "https://cloud.cloverhound.com",
                  "organizationID": "<ORG_ID>",
                  "apiKeyID": "<API_Key_ID>",
                  "apiKeySecret": "<API_Key_Secret>",
                  "agentId": "$STORE.agent.agentId",
                  "agentName": "$STORE.agent.agentName",
                  "locationType": "navigation",
                  "darkmode": "$STORE.app.darkMode",
                  "autoRefreshSeconds": "60"
                },
                "wrapper": {
                  "maximizeAreaName": "app-maximize-area"
                }
              }
            },
            "layout": {
              "areas": [["comp1"]],
              "size": {
                "cols": [1],
                "rows": [1]
              }
            }
          }
        }
      ]
    }
  }
Key points for navigation pages:
nav.label: Text displayed in the navigation sidebar (required)nav.icon: Icon name from Momentum Design library or path to custom SVGnav.iconType: Use"momentumDesign"for Momentum icons or"other"for custom SVG URLsnav.navigateTo: Must match thepage.idvaluepage.id: Unique identifier for the page (must matchnavigateTo)wrapper.maximizeAreaName: Required property for widgets in navigation pageslocationType: Must be set to"navigation"for widgets in navigation pages
Next Steps
After updating the desktop layout, test the configuration by logging into Webex Contact Center Desktop as an agent assigned to the modified team layout.
Important Notes
- Verify your API Key ID and Secret before beginning
- Double-check your Organization ID in the Resource Domain URL
- Contact Cloverhound Cloud support if you need assistance