Omnichannel Strategy
The Omnichannel Strategy dictates the order and type of communication attempts for a dialer campaign. Each campaign runs through its ordered list of steps until an attempt succeeds or every step has been exhausted. You manage the strategy from the Omnichannel tab on a dialer campaign.
The tab only appears when the campaign's channel type is set to Voice or Omnichannel.
How Omnichannel Strategy Works
- The dialer campaign attempts each step in order until a step either succeeds or reaches its maximum number of attempts.
- Cloverhound Cloud records every attempt and its result.
- Self conditions on a step gate which records can enter or advance into it. At import, the first step whose self conditions pass becomes the entry step for a record.
- Jump conditions on a step can redirect a record past intermediate steps when the condition matches.
Accessing the Omnichannel tab
-
Navigate to the Campaigns module and open your dialer campaign.
-
Click the Omnichannel tab.

-
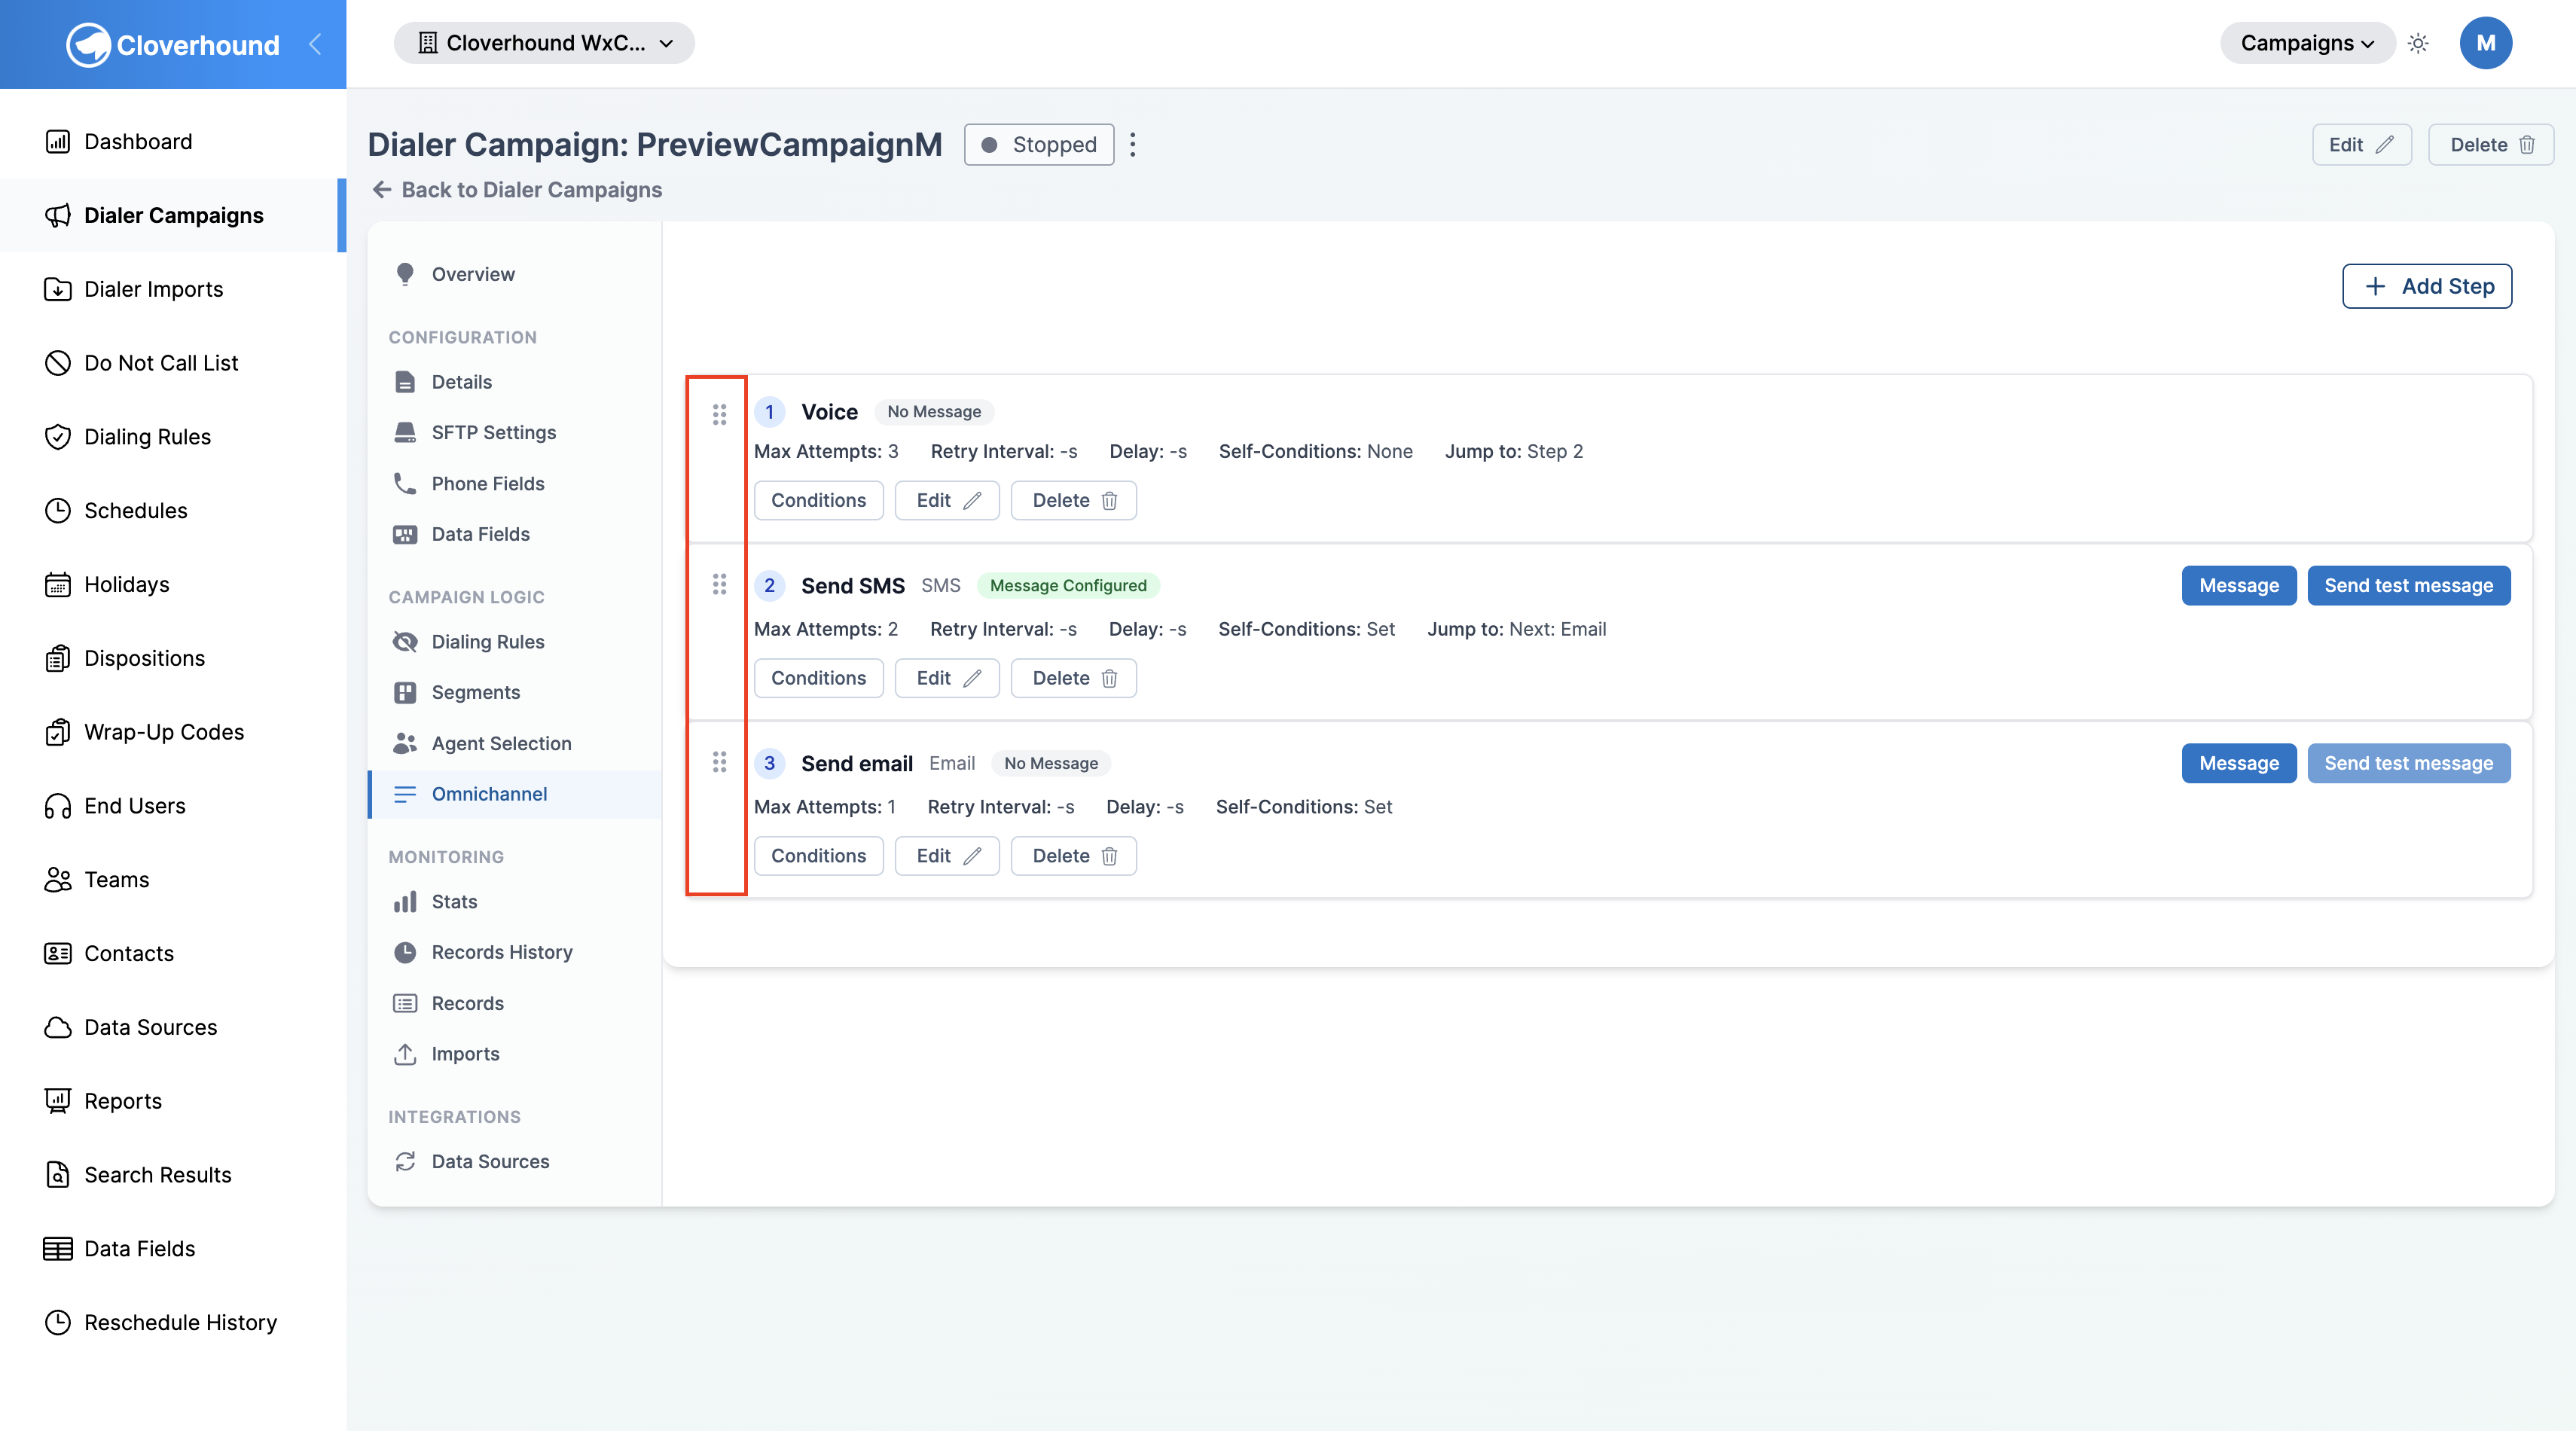
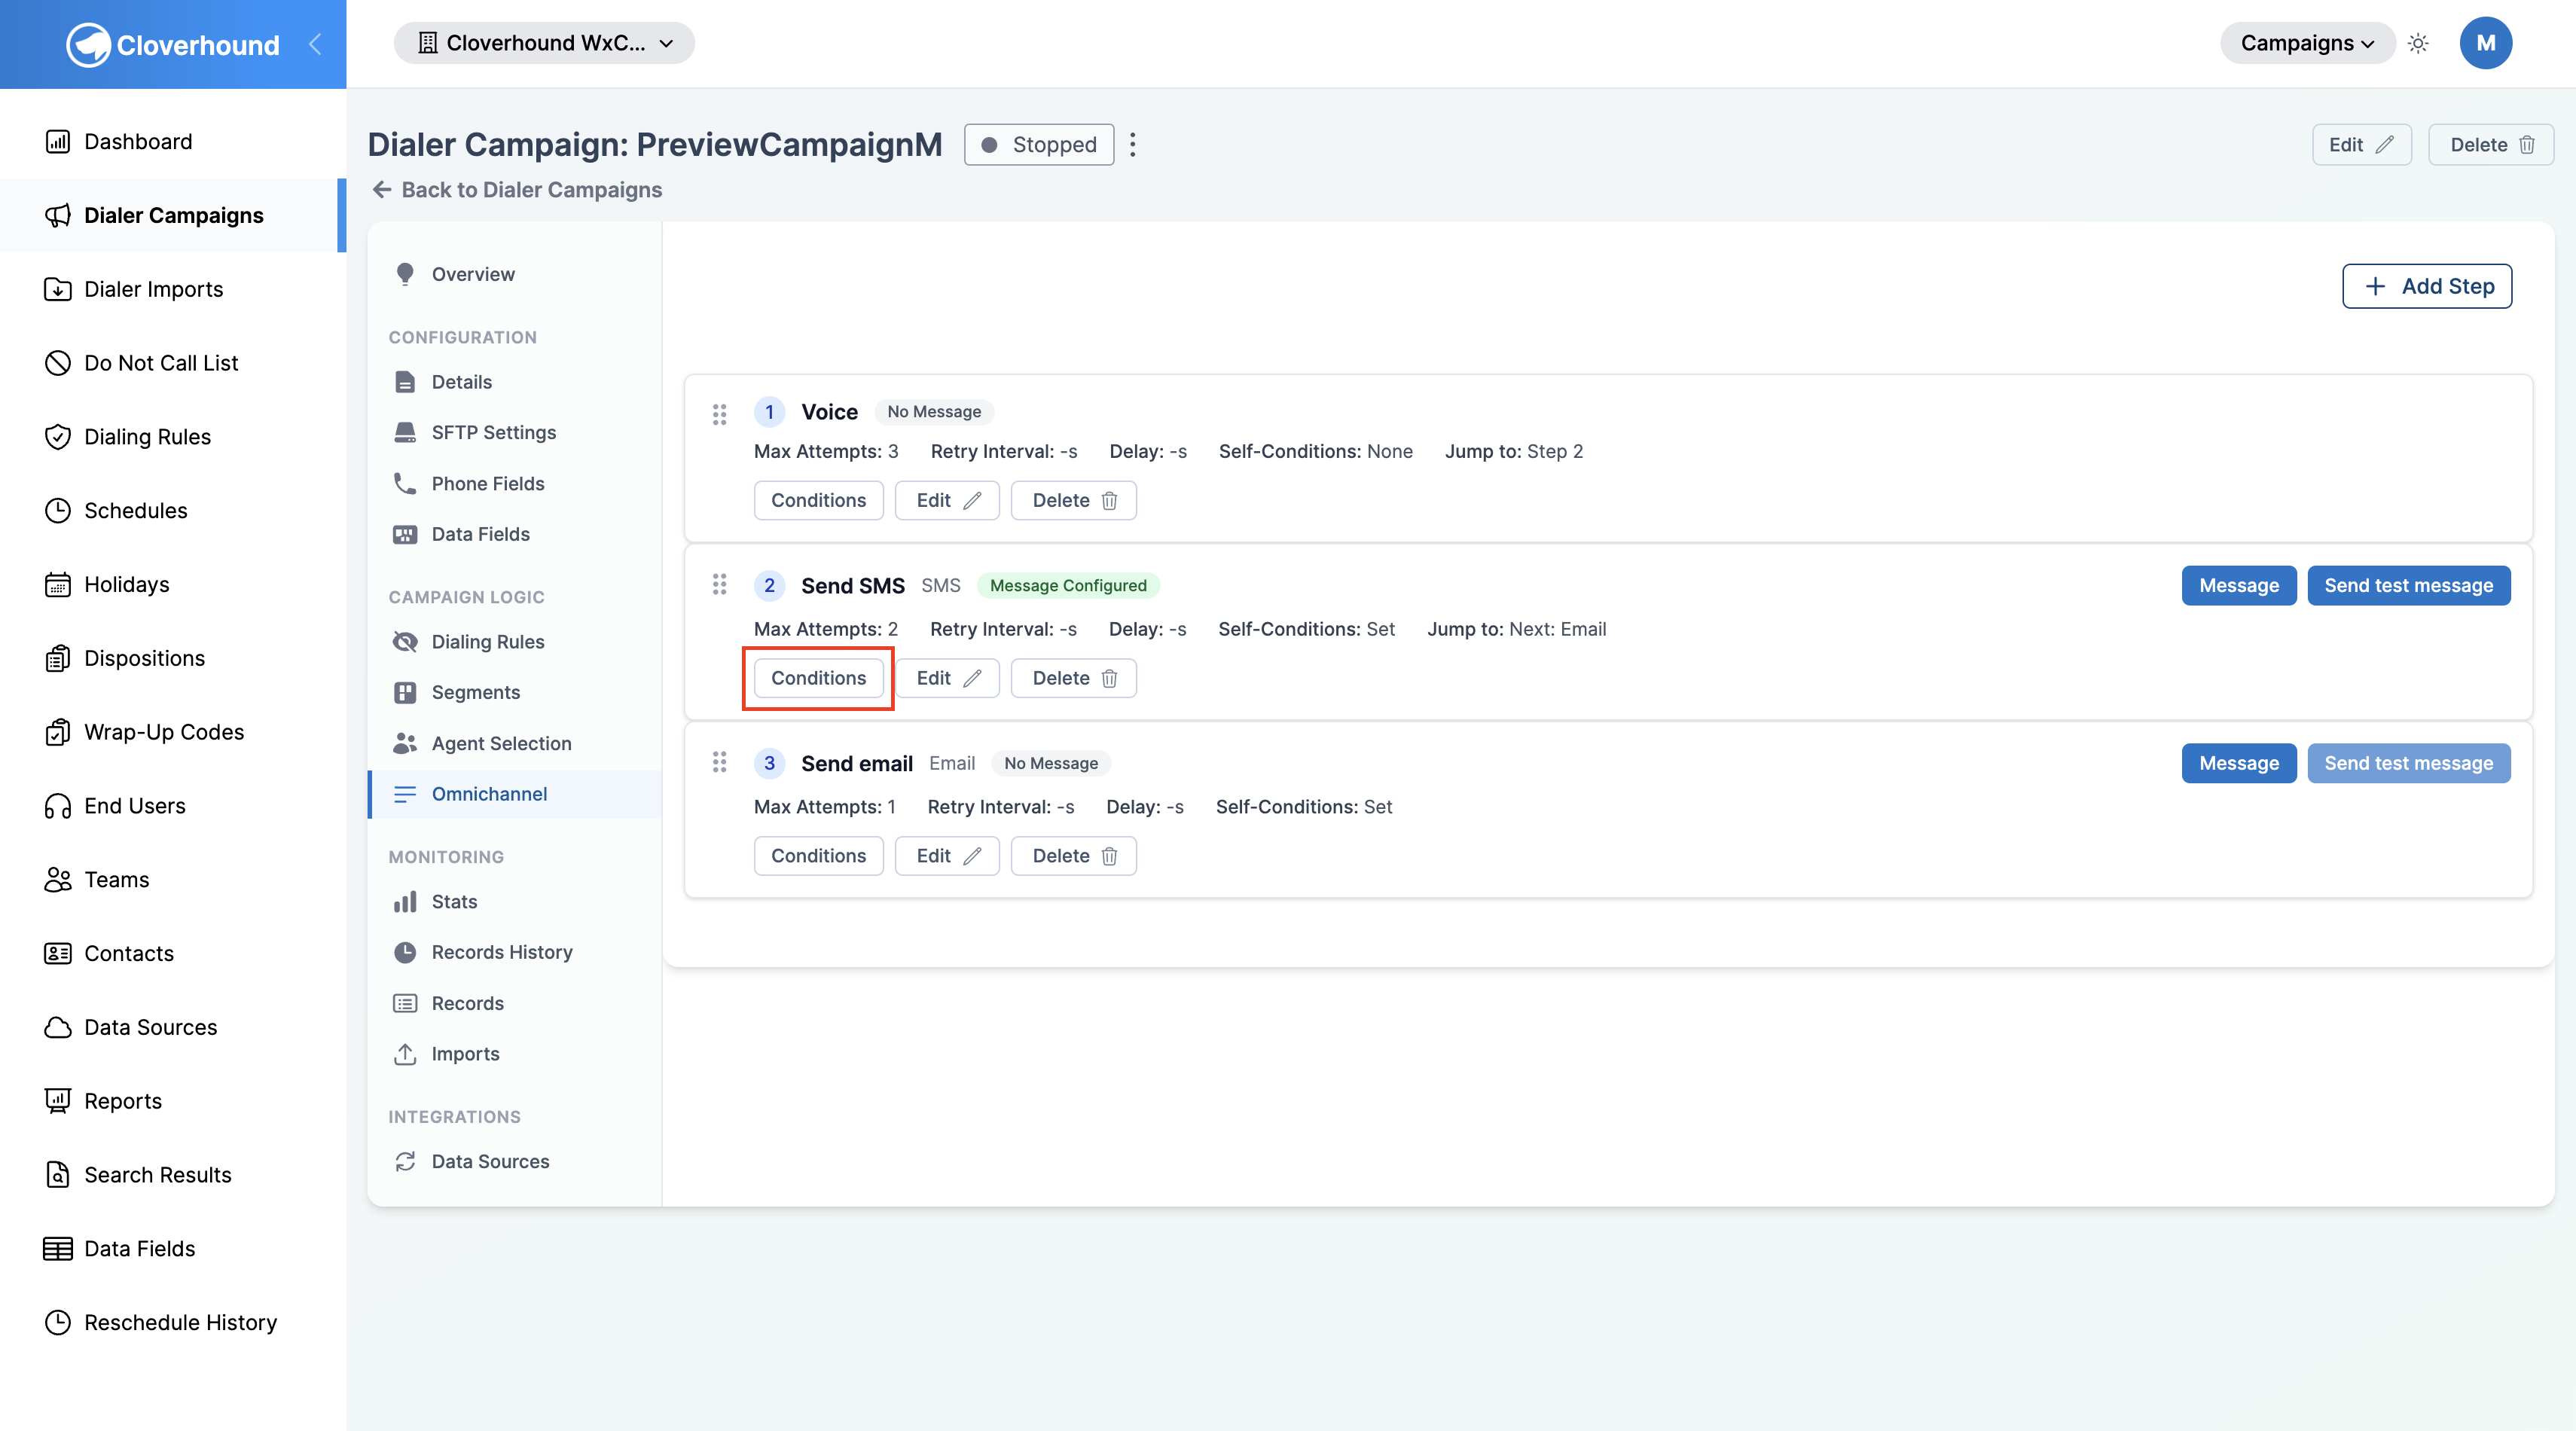
Review the list of existing steps. Each row shows the step number, channel, whether a message is configured, the retry settings, and any jump target.
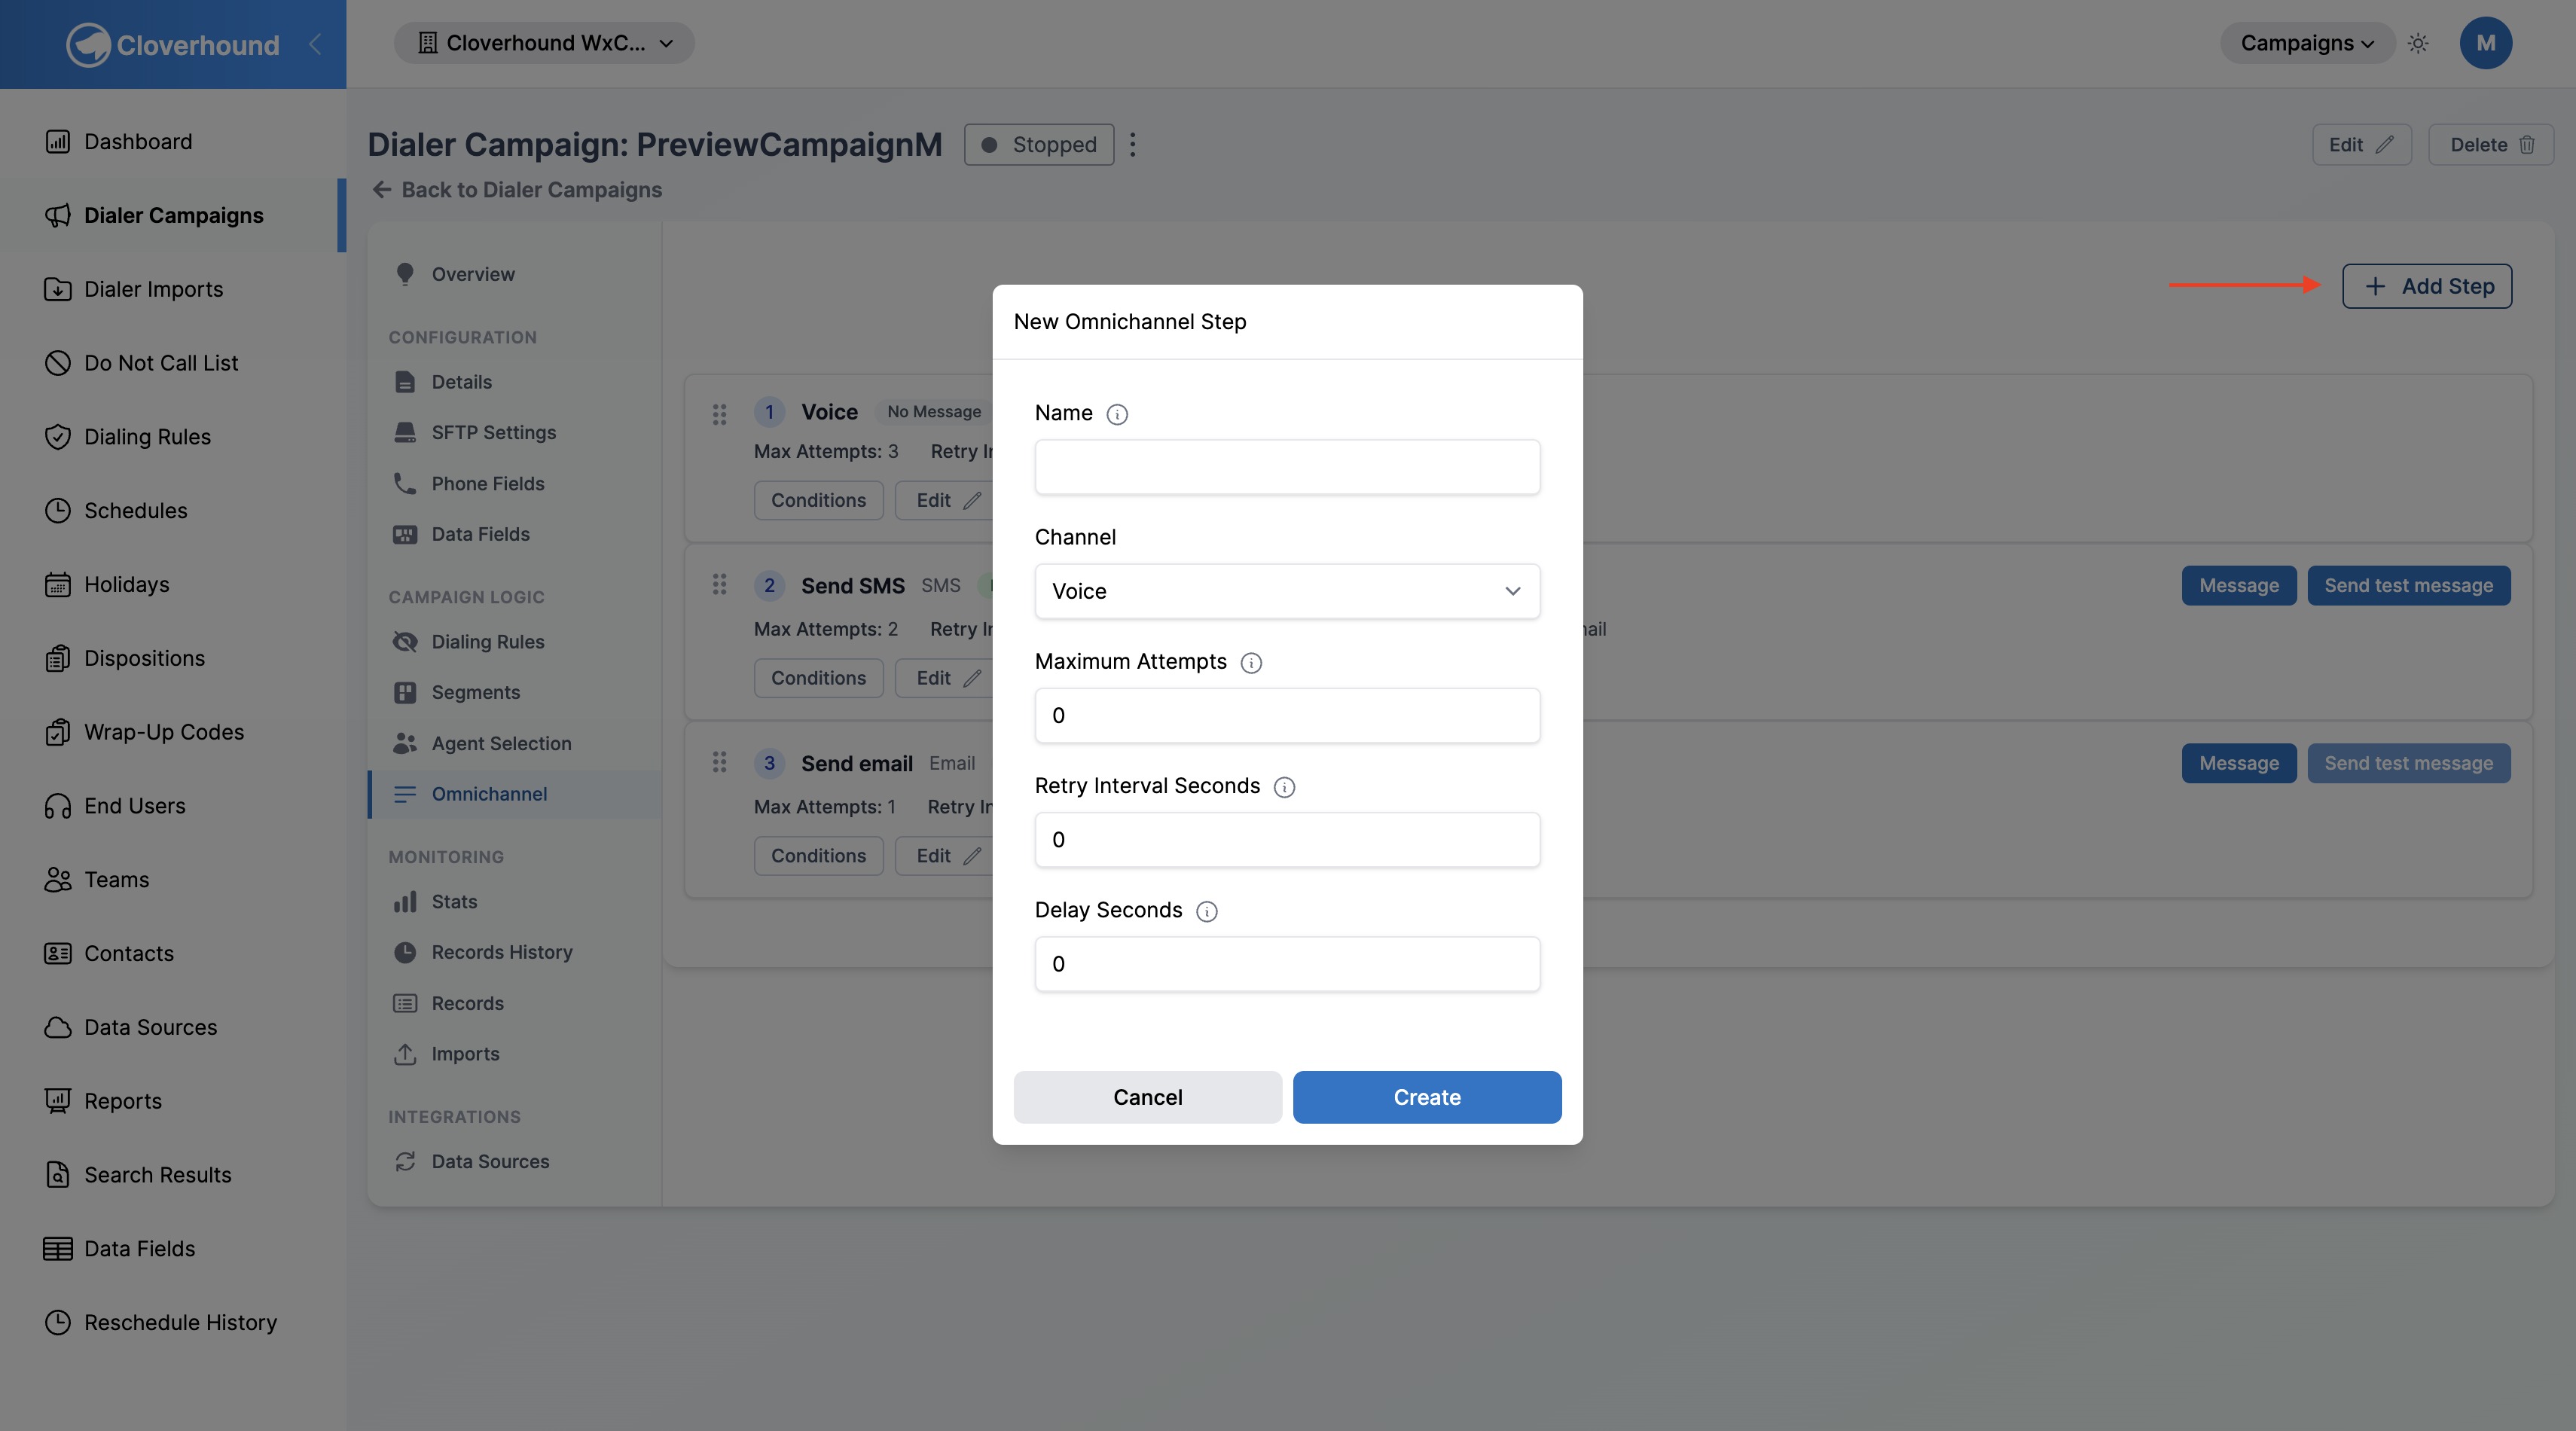
Adding a step
-
Click the Add Step button at the top right of the tab.
-
Fill out the form:
- Name — an optional label for the step. If left blank, the step is identified by its order number and channel.
- Channel — the communication channel for the step. Options include Voice, SMS, Email, Live Chat, Facebook, Apple Business Chat, Google Business Chat, and WhatsApp. Voice is only available when the campaign channel type is Omnichannel.
- Maximum Attempts — the maximum number of attempts to contact a person before moving to the next step.
- Retry Interval Seconds — the interval between attempts to contact the same person on this step.
- Delay Seconds — if the step reaches its maximum attempts, Cloverhound Cloud waits this many seconds before moving on to the next step.
- Service Key — the Webex Connect Service Key. Shown for every channel except Voice.
- Webhook URL — the Webex Connect Webhook URL. Shown for every channel except Voice.
-
Click Create.
Reordering Steps
Reorder steps by dragging them into the desired position. Cloverhound Cloud persists the new order as soon as you drop the step.
-
Grab the drag handle on the left edge of a step row.
-
Drag the row up or down to its new position and release it. The step numbers update automatically and the new order is saved.
If a reorder would leave a jump condition pointing backward (jumps must always go forward), Cloverhound Cloud clears that jump condition automatically and logs a warning. Review the affected step's Conditions after moving rows around to confirm the jump target still reflects what you want.
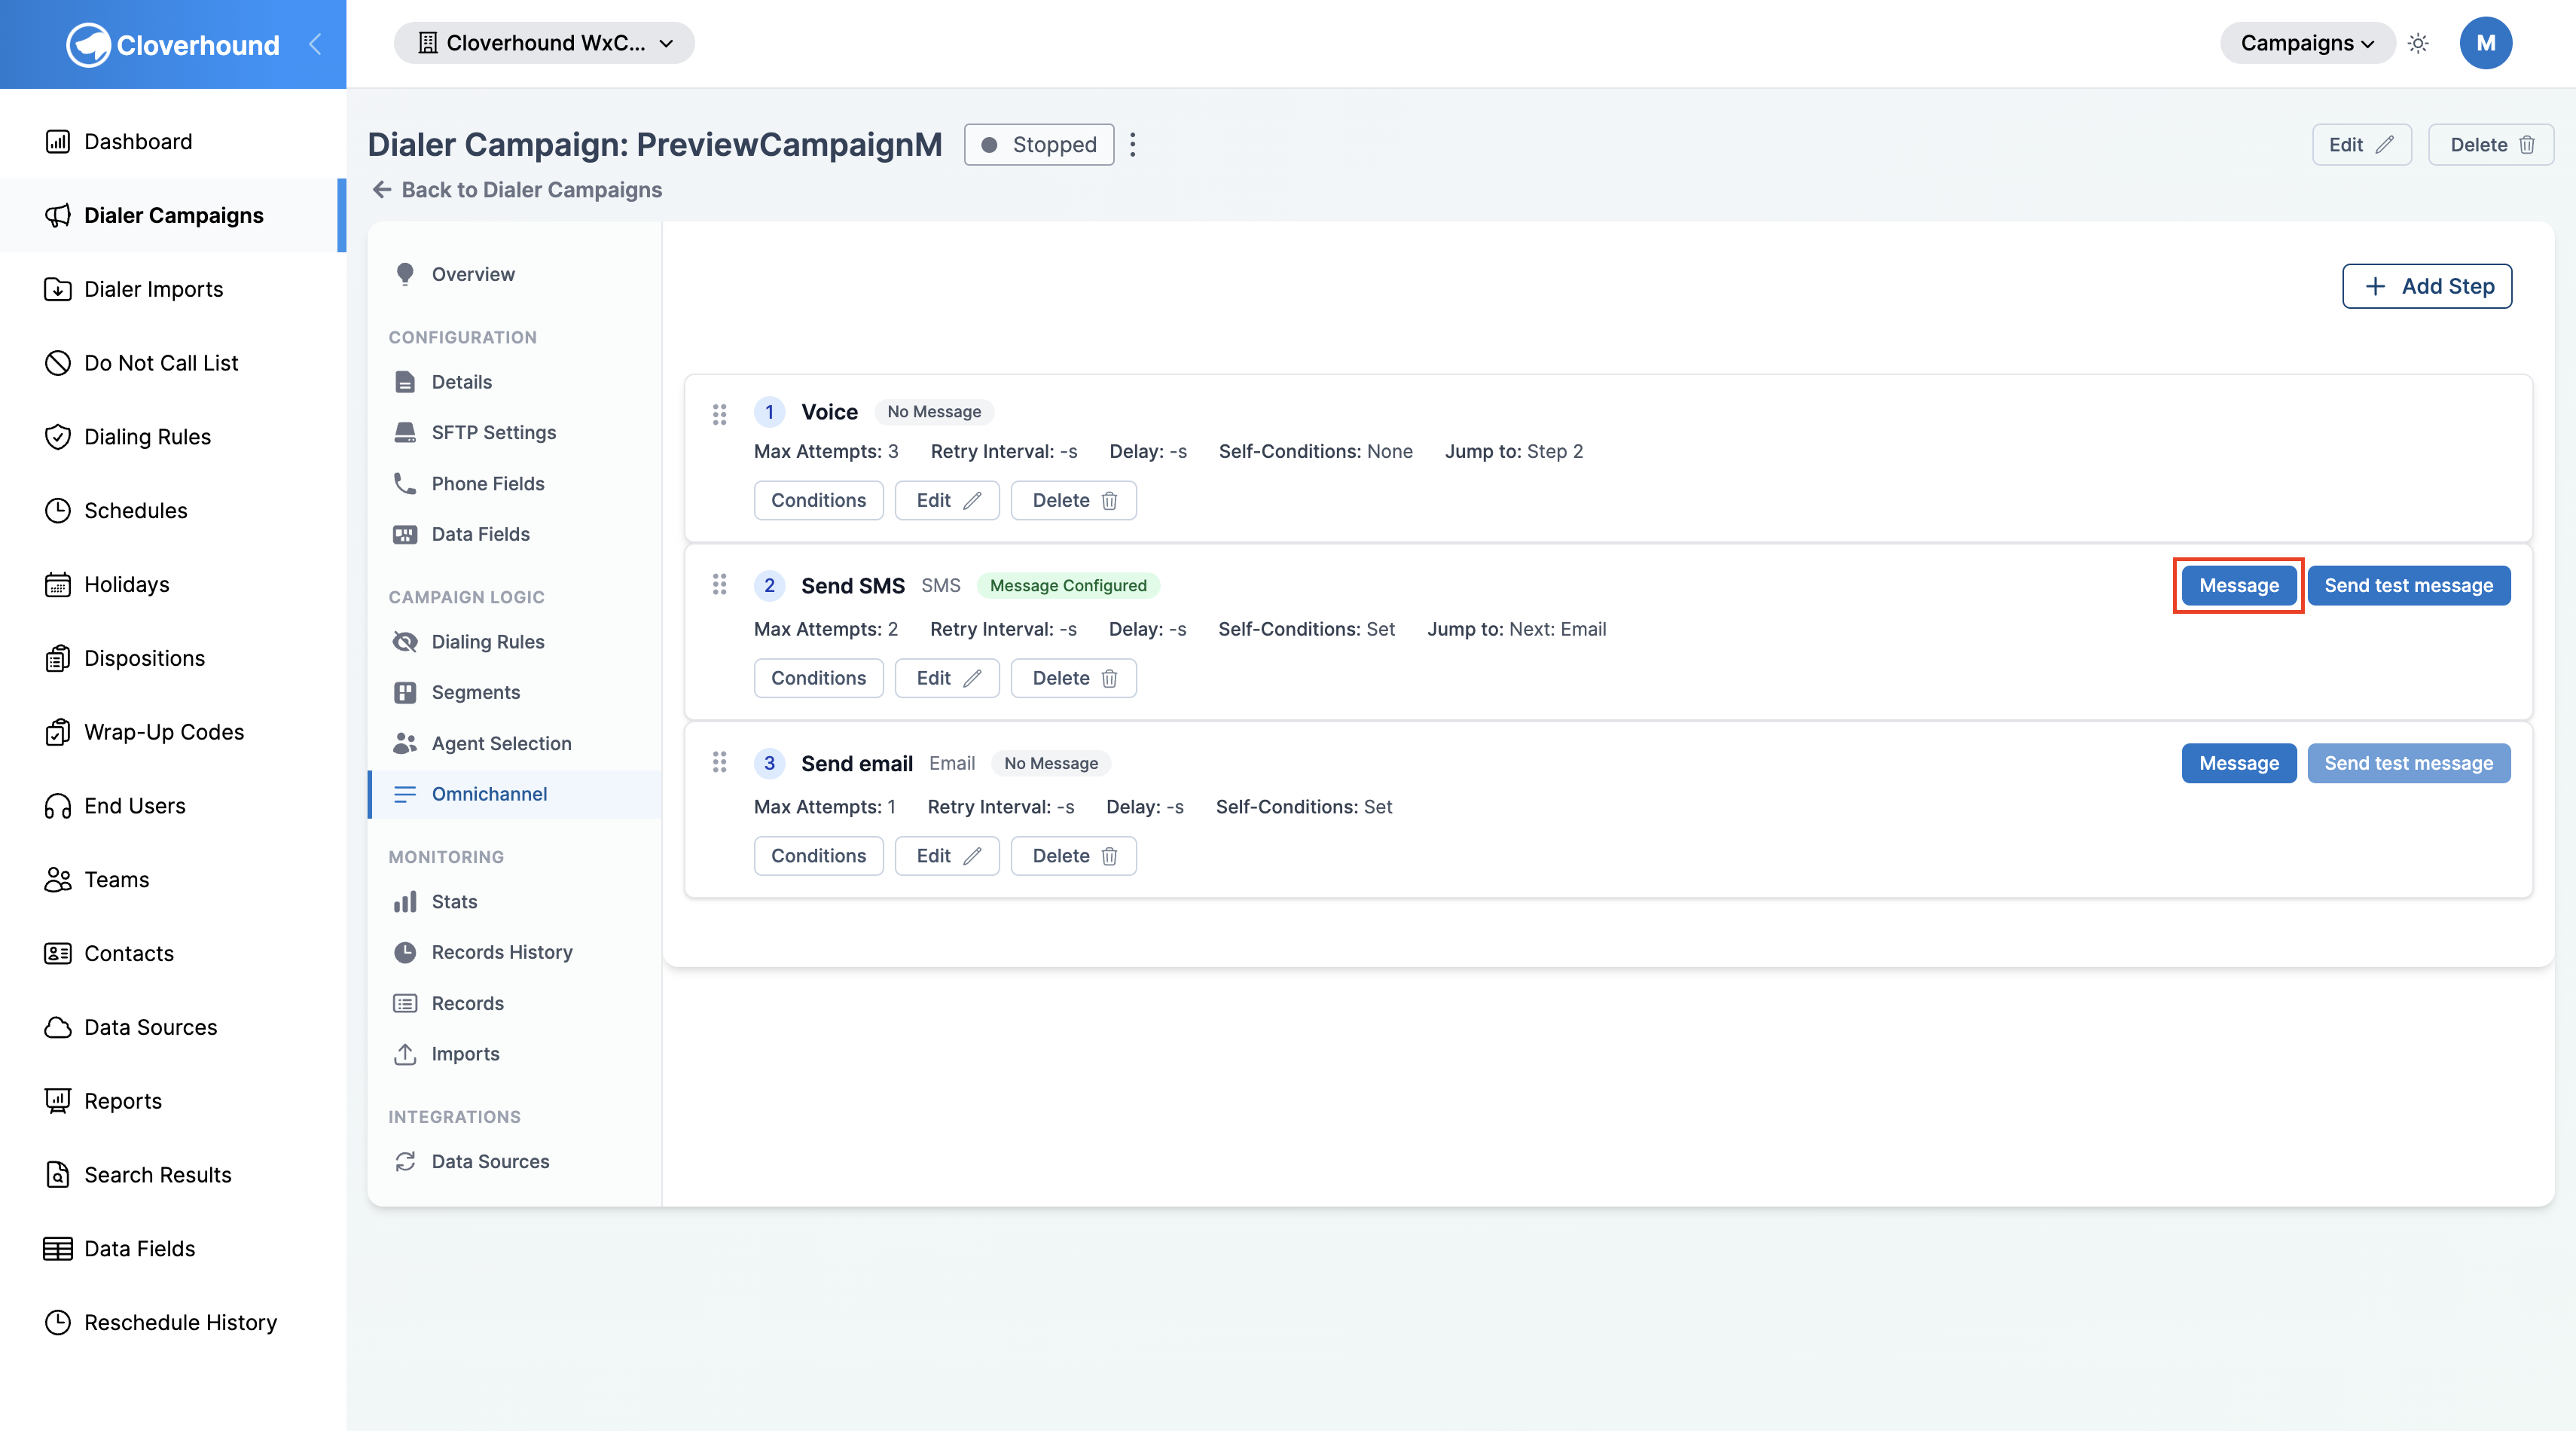
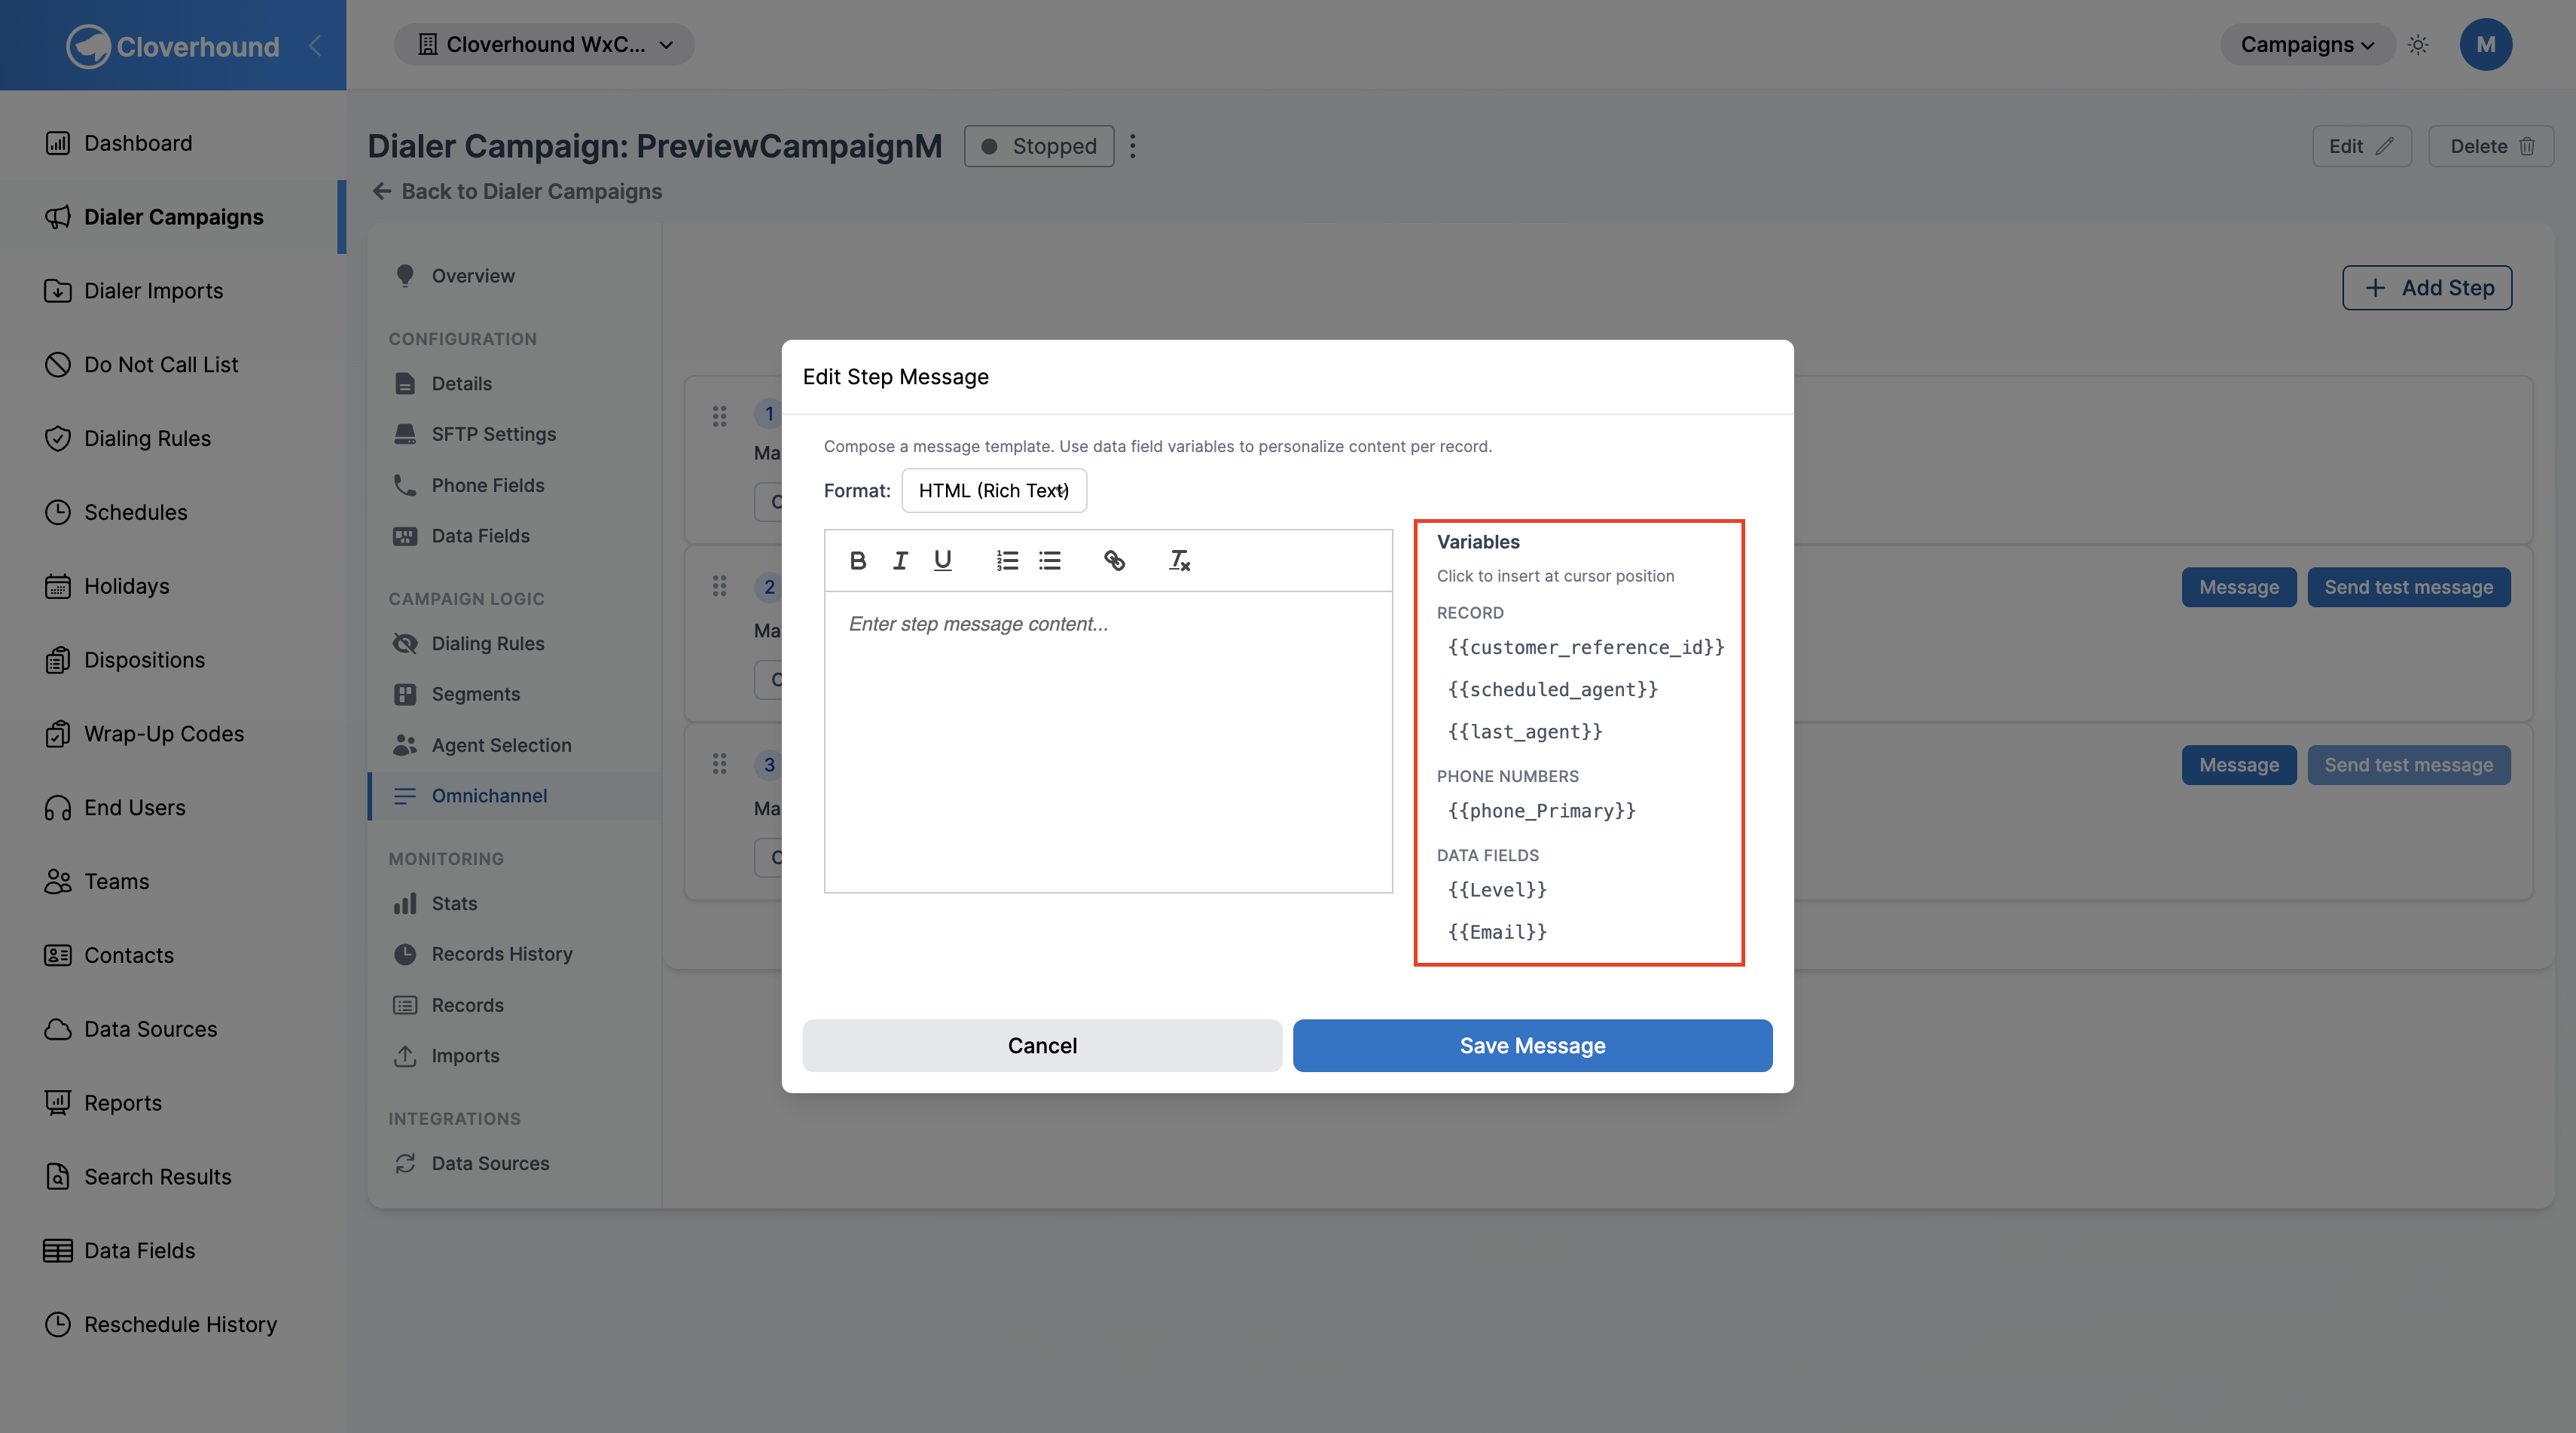
Editing a Step's Message
Every non-voice step can carry a message template. WhatsApp steps always use a preconfigured template from Webex Connect, so the Message editor is disabled for WhatsApp.
-
Click the Message button on the step row.
-
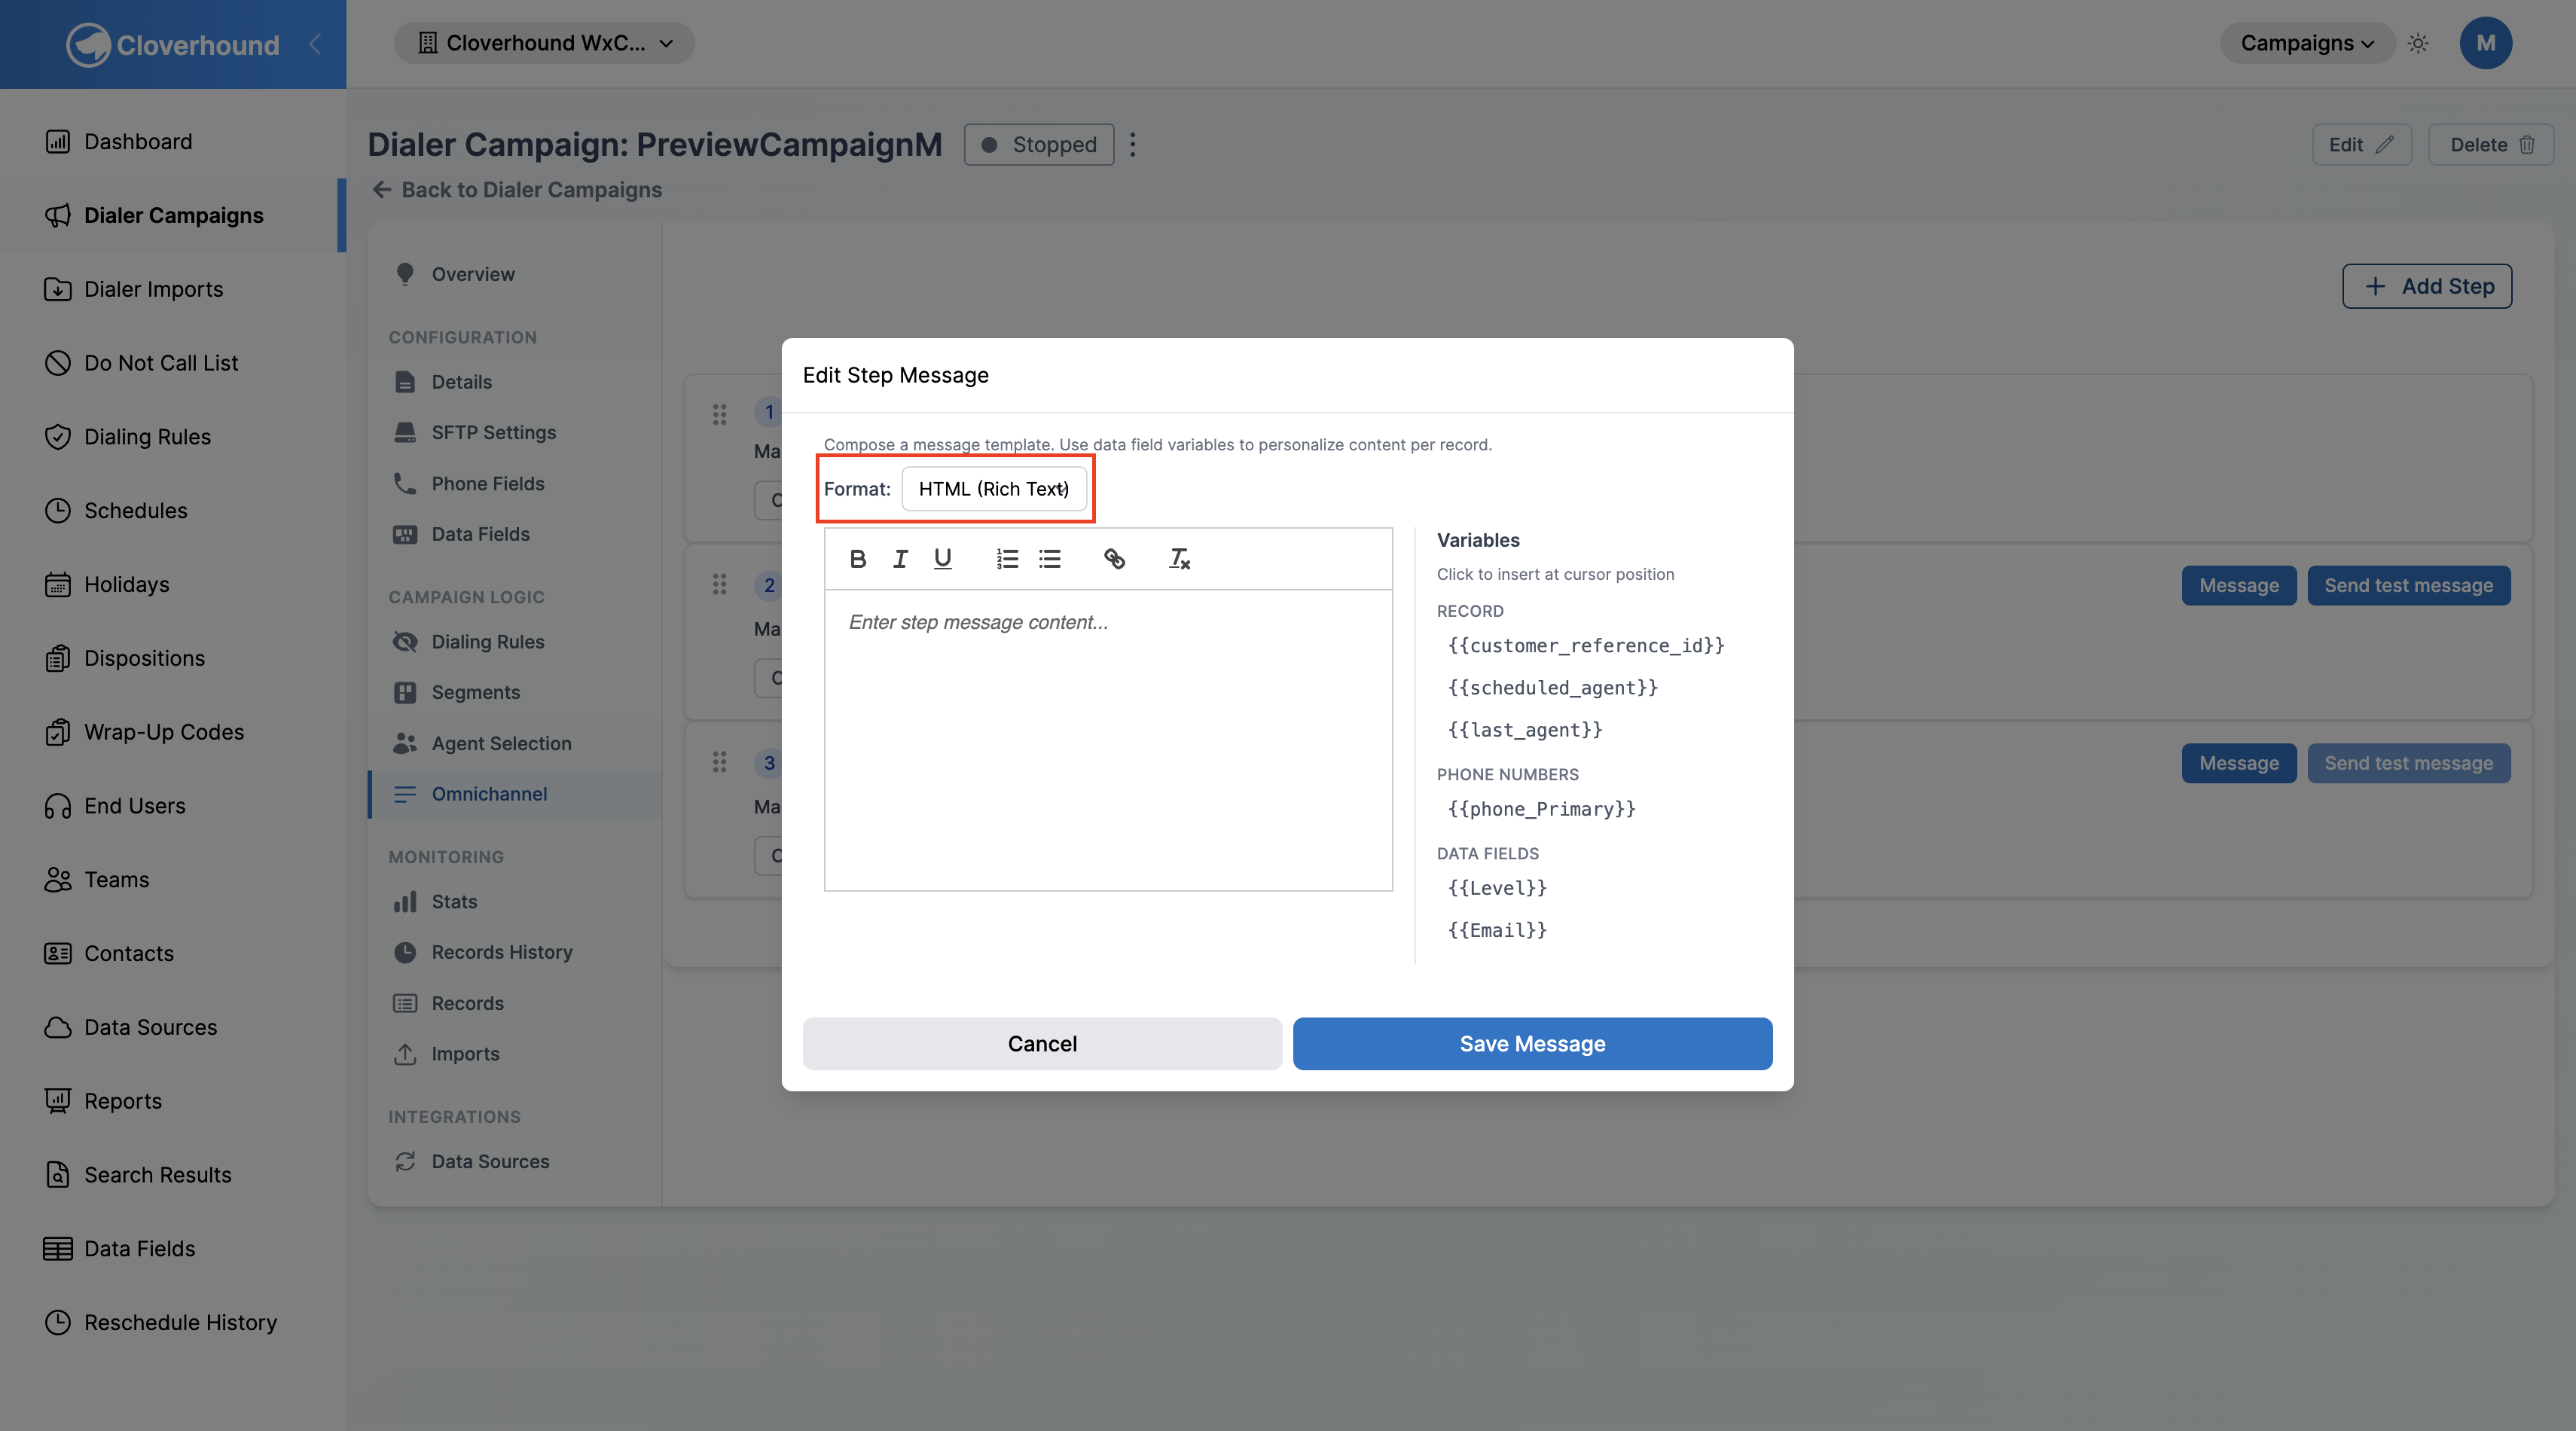
Choose the format. Email steps can use HTML (Rich Text) or Plain Text. All other channels are locked to Plain Text.
-
Compose the message in the editor.
- Plain Text steps use a plain textarea.
- HTML steps use a rich-text editor with bold, italic, underline, ordered lists, bullet lists, and links.
-
Insert a variable from the right-hand Variables sidebar by clicking any
{{variable_name}}token. The token is inserted at the cursor. Available variables include:- Record —
{{customer_reference_id}},{{scheduled_agent}}, and{{last_agent}}. - Phone Numbers — one token per configured phone field on the campaign (for example,
{{phone_Mobile}}). - Data Fields — one token per campaign-specific and globally mapped data field.
- Record —
-
Click Save Message.
Switching an Email step from HTML back to Plain Text discards any HTML formatting in the current draft. Cloverhound Cloud asks you to confirm before discarding.
Sending a Test Message
After configuring a step's Service Key and Webhook URL, use Send test message to verify delivery.
- Click the Send test message button on the step row.
- Enter the To and From phone numbers in E.164 format (for example,
+15556667777). The From number must be configured in Webex Connect. - Enter the Message content. WhatsApp steps skip this field because they use the configured template.
- Click Send Test Message.
Configuring Self Conditions
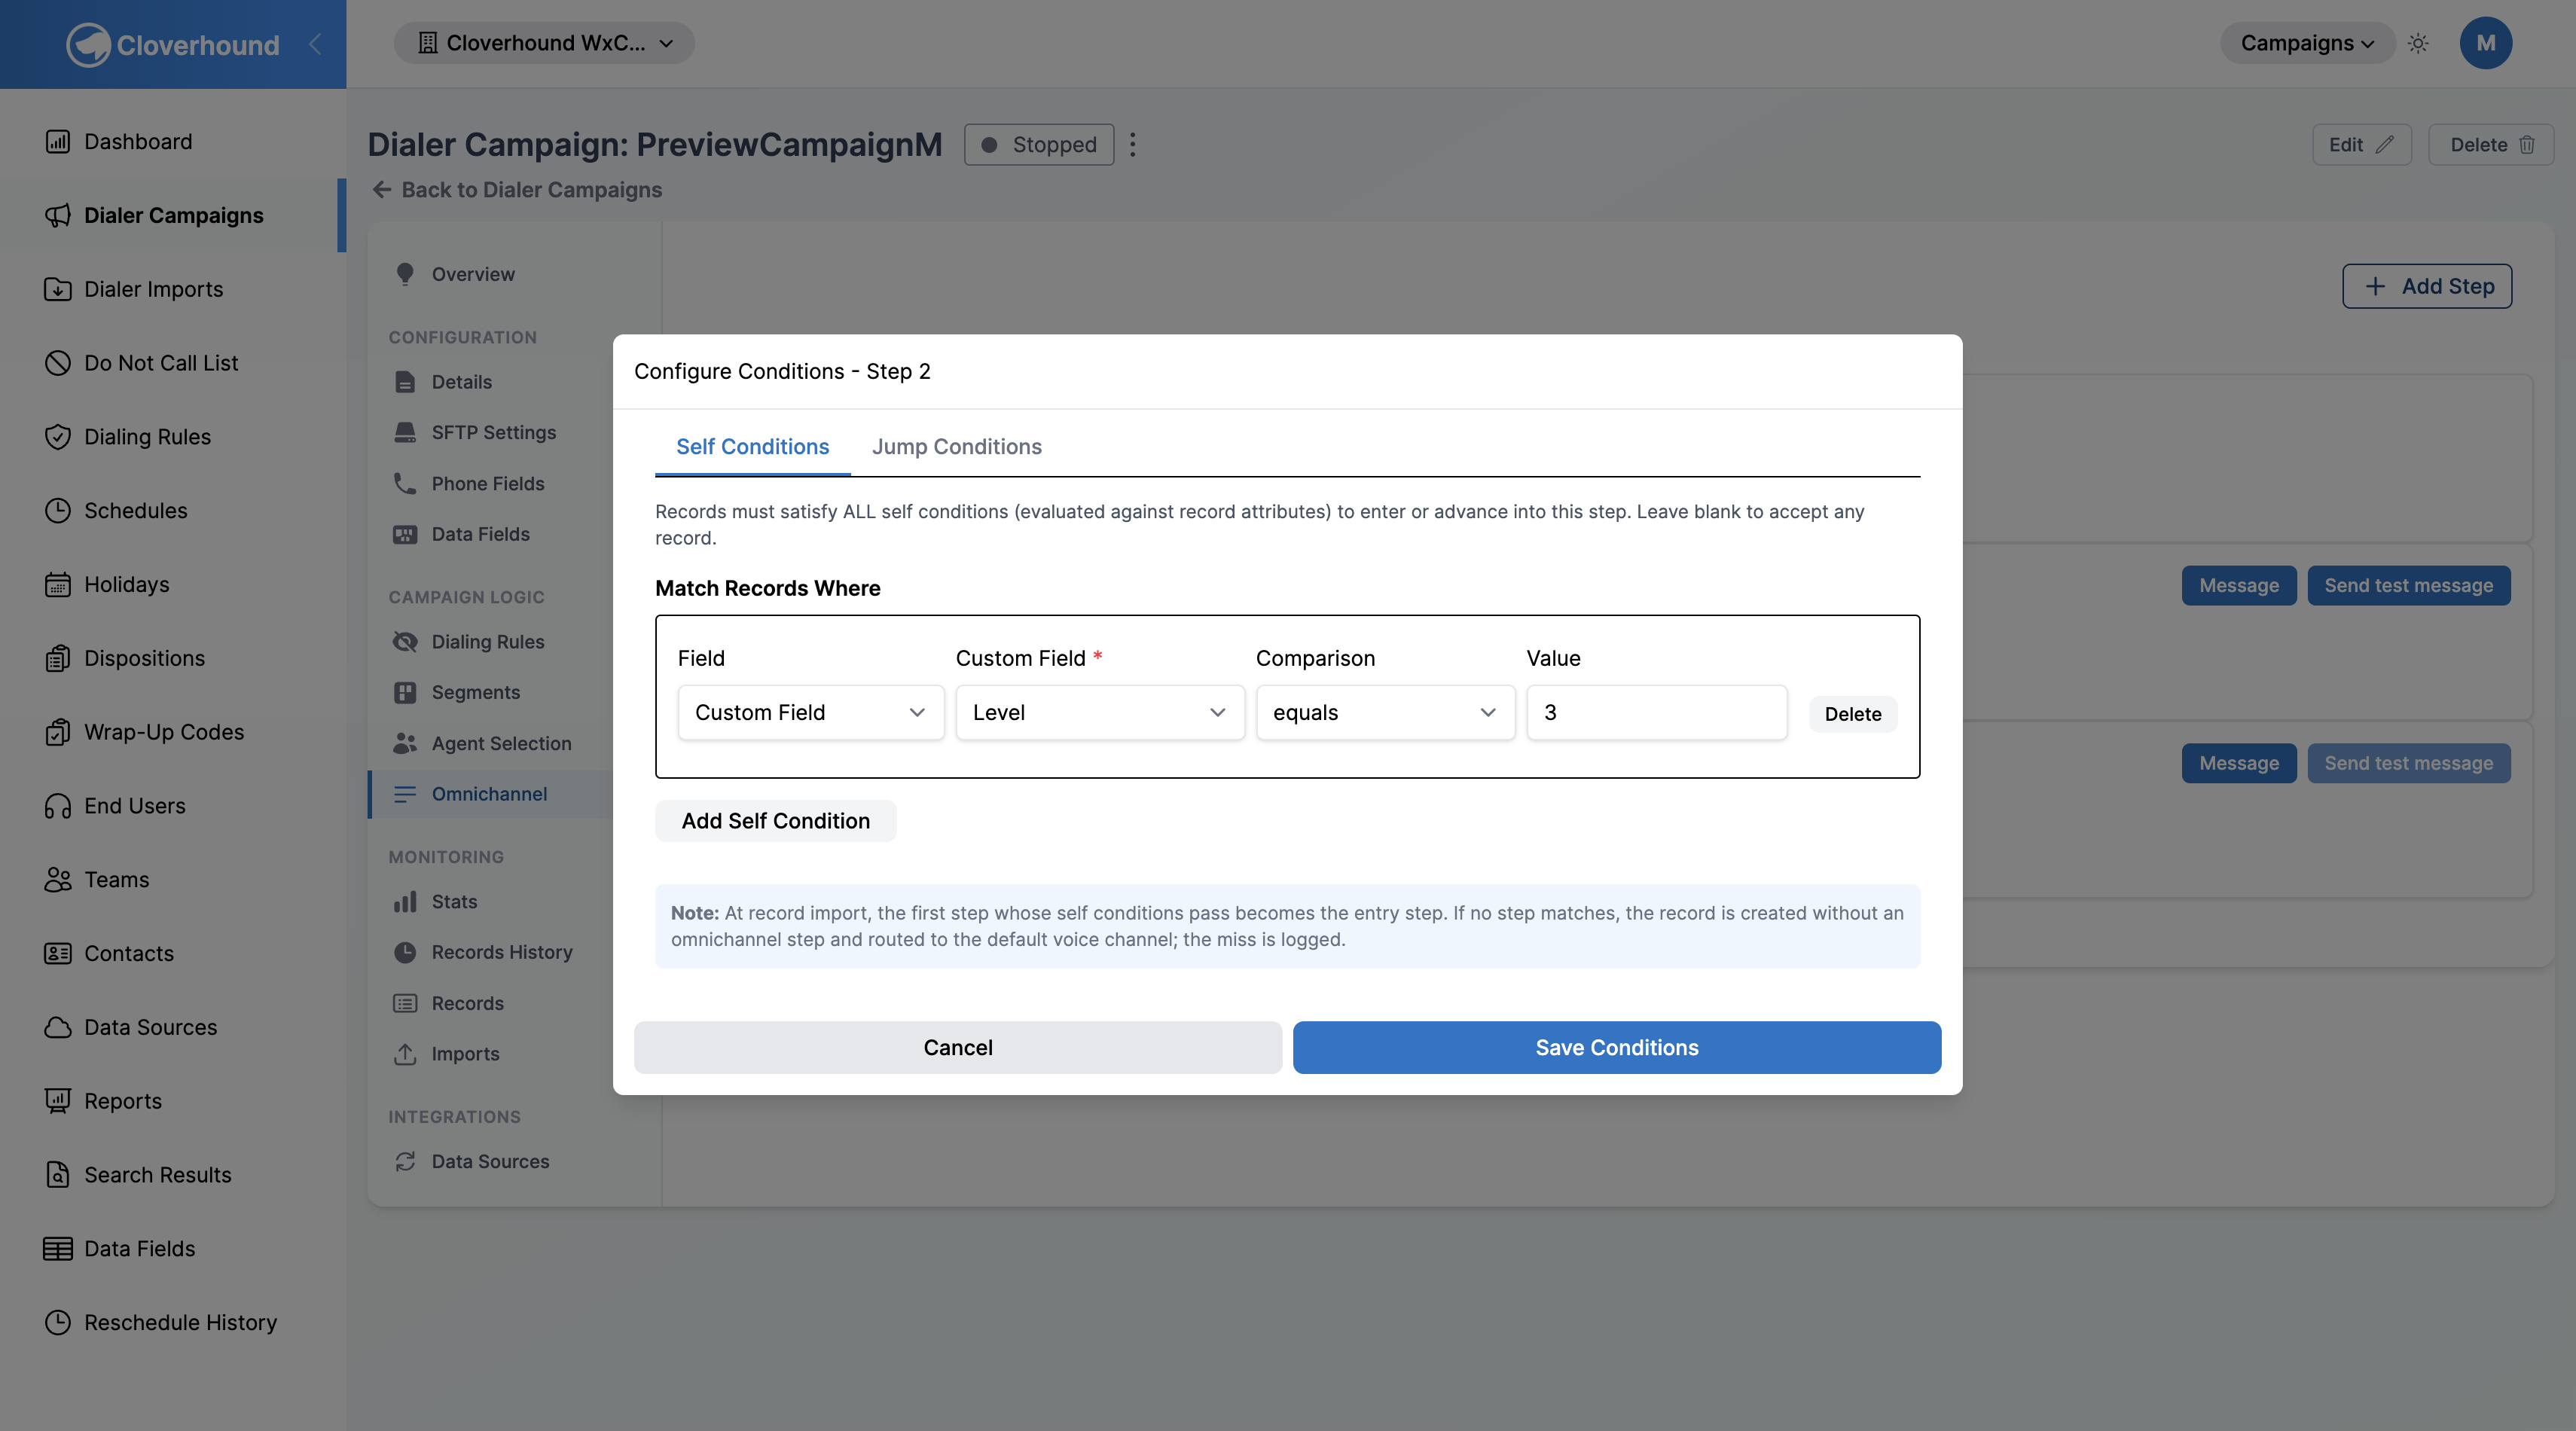
Self conditions determine which records are allowed to enter or advance into a step. Cloverhound Cloud evaluates them against the record's current attributes before a step is assigned. A step with no self conditions accepts any record.
At record import, Cloverhound Cloud scans the steps in order and assigns the first step whose self conditions pass. If no step matches, the record is created without an omnichannel step and routed to the default voice channel; the miss is logged.
-
Click the Conditions button on the step row.
-
Select the Self Conditions tab in the editor.
-
Click Add Self Condition for each rule you want to apply. All self conditions on a step must match for the record to enter it.
-
Configure each condition:
- Field — choose one of:
- Wrap-Up Code — the wrap-up code most recently applied to the record.
- Campaign Disposition — the campaign-level disposition applied to the record.
- Record Attempts — the total number of contact attempts made across all steps.
- Custom Field — a campaign-specific data field (available when the campaign has custom fields configured).
- Comparison — the operator. Available operators depend on the field:
- Wrap-Up Code and Campaign Disposition support
equals,does not equal,is blank, andis not blank. - Record Attempts supports
less than,less than or equal,equals,greater than or equal,greater than, andbetween. - Custom Fields: numeric fields support equality, numeric-ordering, and existence operators; text, email, and URL fields support equality, contains/doesn't contain, and existence operators.
- Wrap-Up Code and Campaign Disposition support
- Value — the value to compare against. For
between, enter a Min Value and Max Value. Foris blankoris not blank, no value is required.
- Field — choose one of:
-
Click Save Conditions.
If the first step has self conditions that reference Wrap-Up Code or Campaign Disposition, those conditions will never match at import because new records do not yet have a wrap-up code or campaign disposition. Records will bypass that step and route to the default voice channel. Place entry-gate conditions of this type on a later step, or use Record Attempts to distinguish fresh records.
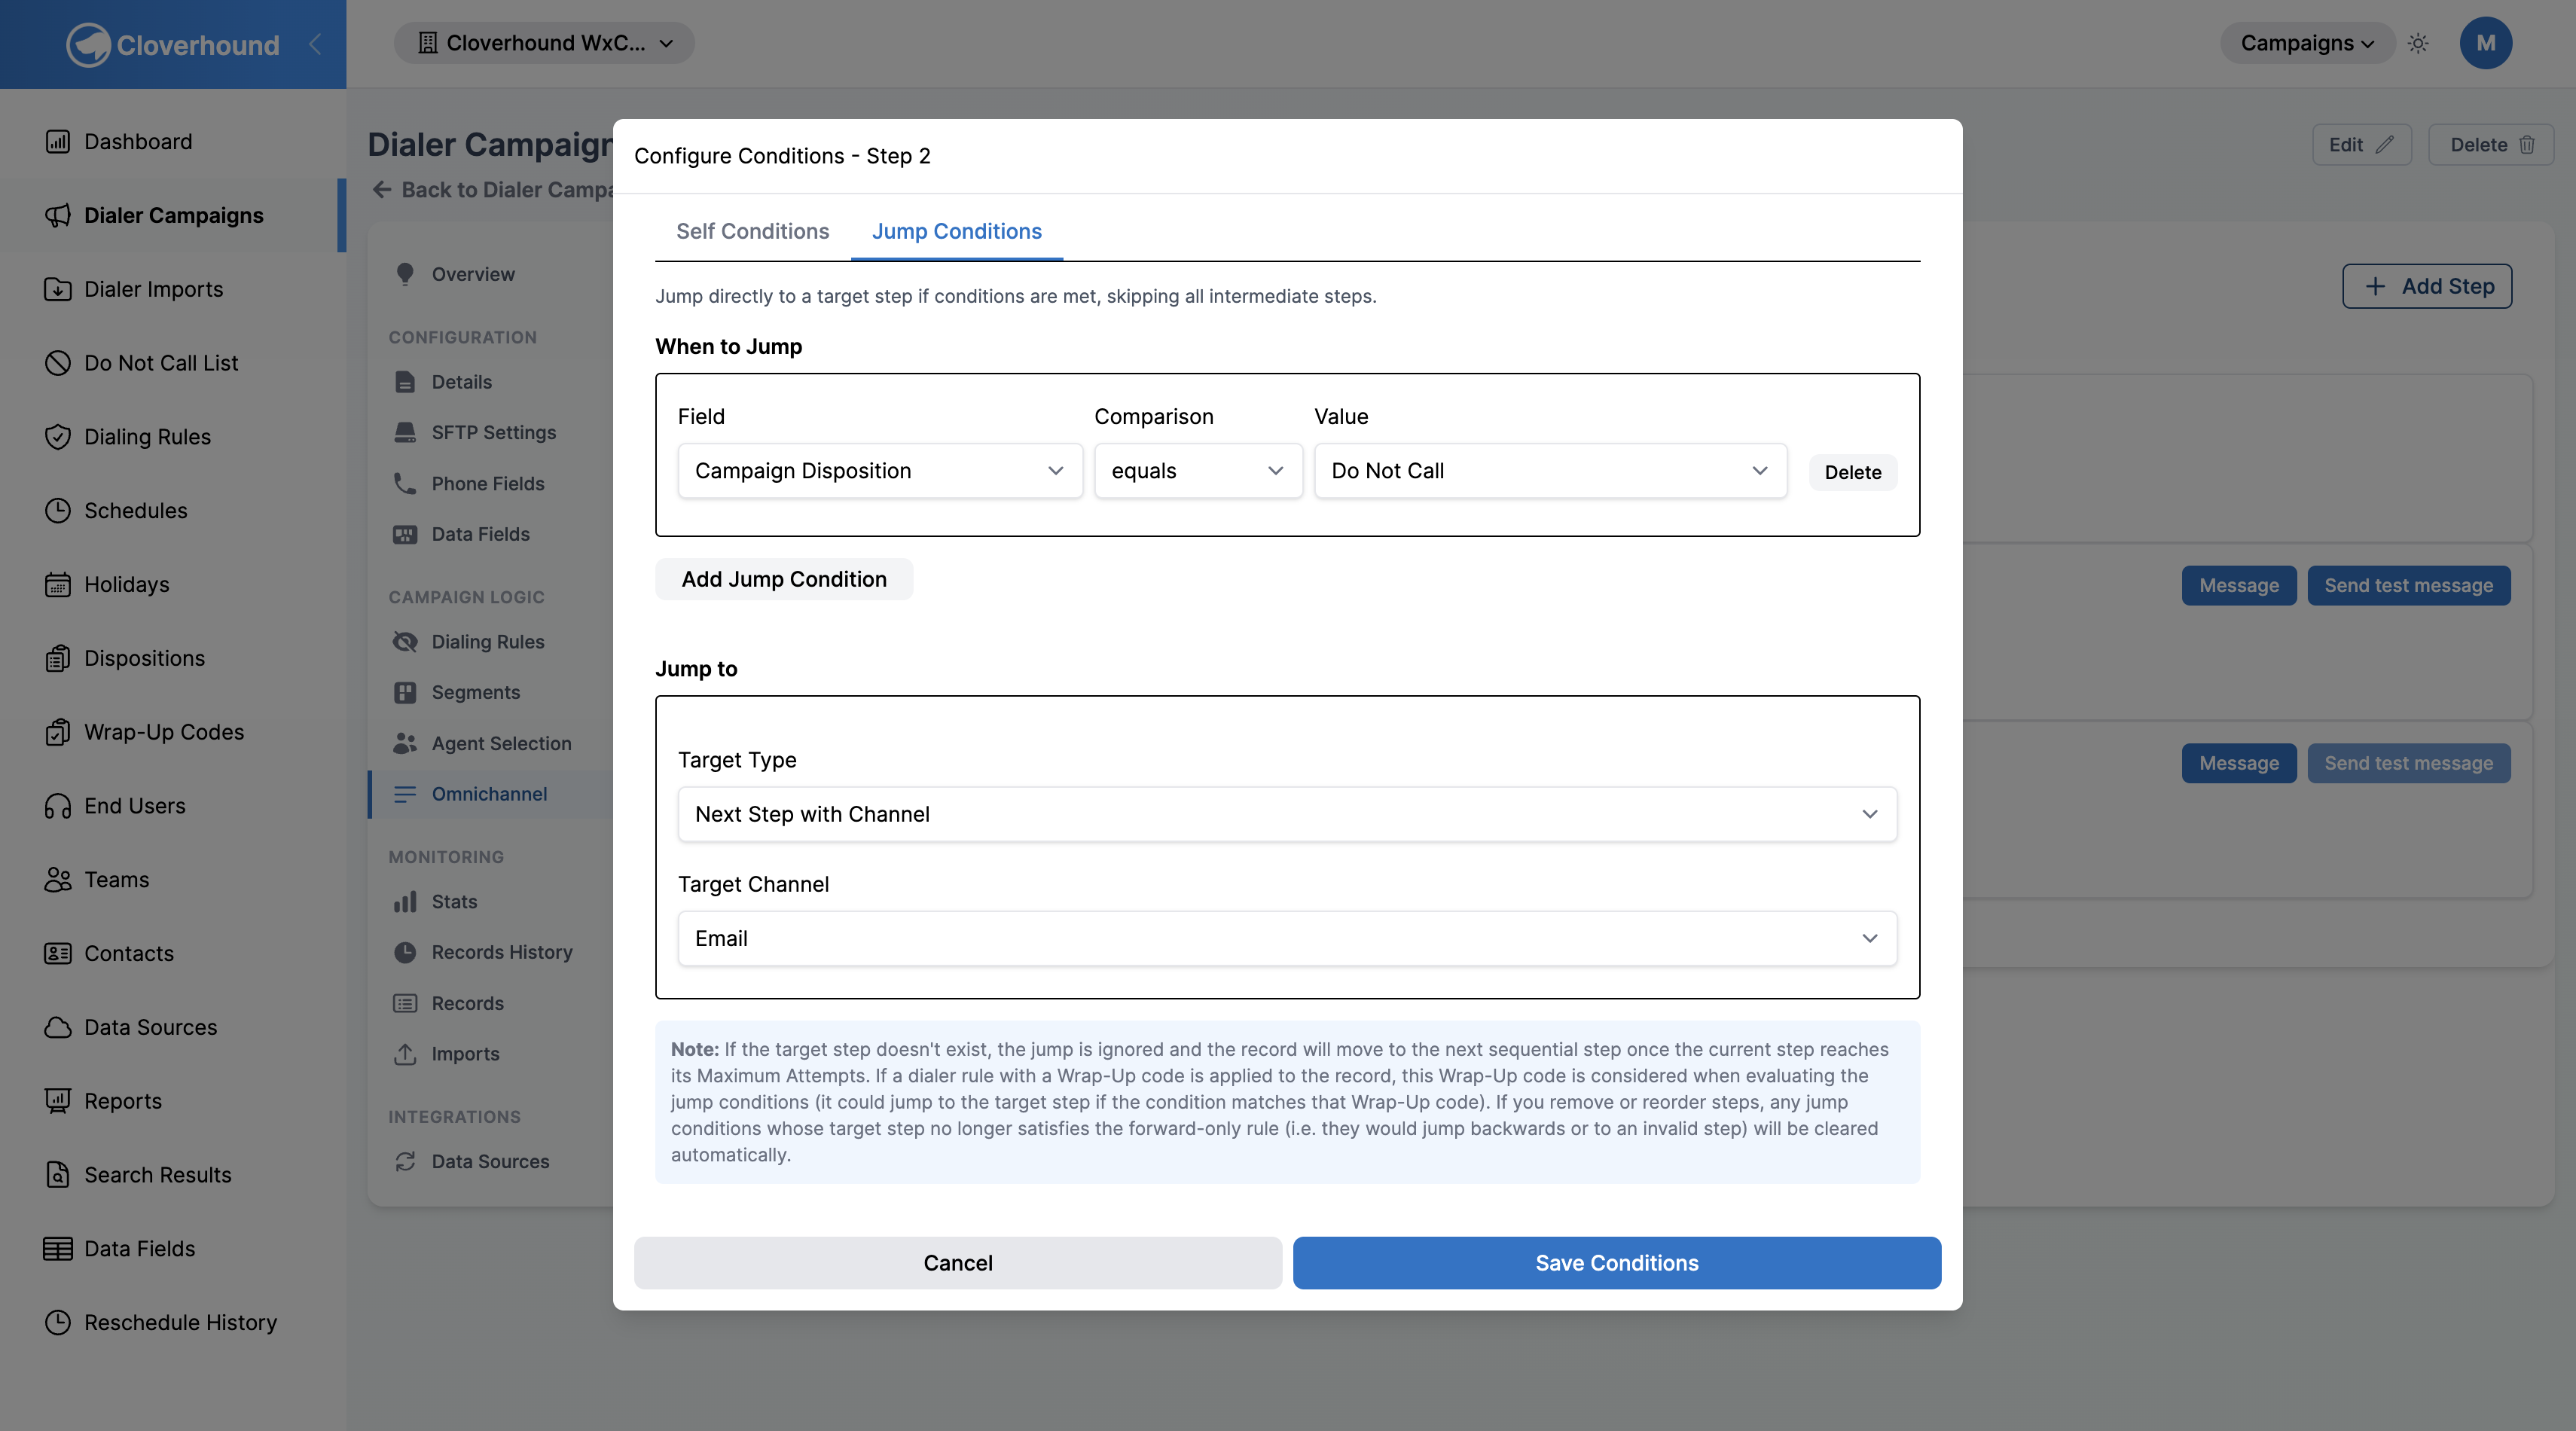
Configuring Jump Conditions
Jump conditions let a step skip ahead to a specific target step when a record matches the configured conditions. Jumps are always forward-only: the target step must have a higher order than the source step.
-
Click the Conditions button on the step row.
-
Select the Jump Conditions tab in the editor.
-
Click Add Jump Condition for each rule you want to apply. All conditions on a step must match for the jump to fire.
-
Configure each condition:
- Field — choose one of:
- Dialer Result — the outcome reported by the dialer (for example,
Live Voice,Busy,No Answer,Answering Machine). - Wrap-Up Code — a wrap-up code from your organization.
- Campaign Disposition — a campaign-level disposition from your organization.
- Record Attempts — the total number of contact attempts made across all steps.
- Time Since Import — days since the record was imported (available when the feature flag is enabled).
- Custom Field — a campaign-specific data field (available when the campaign has custom fields configured).
- Dialer Result — the outcome reported by the dialer (for example,
- Comparison — the operator. The available operators depend on the field:
- Dialer Result, Wrap-Up Code, and Campaign Disposition support
equals,does not equal,is blank, andis not blank. - Record Attempts and Time Since Import support
less than,less than or equal,equals,greater than or equal,greater than, andbetween. - Custom Fields: numeric fields support equality, numeric-ordering, and existence operators; text, email, and URL fields support equality, contains/doesn't contain, and existence operators.
- Dialer Result, Wrap-Up Code, and Campaign Disposition support
- Value — the value to compare against. For
between, enter a Min Value and Max Value (positive integers, min less than max). Foris blankoris not blank, no value is required.
- Field — choose one of:
-
Set the Jump to target. Pick a Target Type, then pick the value:
- Step by Order — choose a later step by its current order number. If steps are reordered later, Cloverhound Cloud remaps the target to follow the step.
- Step by ID — choose a later step by its underlying ID. The jump continues to point at the same step even if order numbers change.
- Next Step with Channel — choose a channel (for example,
SMS). The jump targets the next step with that channel after the current step.
-
Click Save Conditions.
If the target step is deleted or a reorder makes the jump point backward, Cloverhound Cloud clears that jump condition automatically and logs a warning. If the target step is missing at runtime, the jump is ignored and the record moves to the next sequential step once the current step reaches its Maximum Attempts.
Deleting a step
- Click the Delete button on the step row.
- Confirm the prompt. Any jump conditions on other steps that targeted this step are cleared automatically, and the remaining steps are renumbered so there are no gaps.
A step cannot be deleted while dialer records still reference it. If Cloverhound Cloud reports that the step is still in use, wait for those records to complete or finish the campaign before retrying.
With the Omnichannel tab, you can order communication attempts, personalize step messages with campaign variables, and branch the flow based on dialer outcomes.